Earlier this year, Creative Memories started offering a new product called laser paper! Laser paper is similar to large cut-files that some create with their Cricuts or other cutting machines. The laser paper pieces are intricately cut from heavy cardstock and include spaces for photographs. The laser papers are double-sided with different colorings on each side. Our first offering was the Beneath the Pines Laser Paper.

The Beneath the Pines Laser Paper was inspired by vines, lush leaves, overgrown foliage and perfectly prickly pine cones. You’ll find the Beneath the Pines Laser Paper in the Last Chance section of the website. Although the Beneath the Pines Paper and Stickers are sold out, the laser paper coordinates with other current collections. I paired this piece from the Beneath the Pines Laser Pack with paper and embellishments from our current All My Love collection. I just need to add journaling instead the green tag.

To make my layout:
1. Cut a hollow frame from a piece of Brown Cardstock.
2. Cut a piece of All My Love Paper to 11-1/2″ x 11-1/2″, and adhere to the hollow frame.
3. Use Repositionable Tape to adhere the photos to the backside of the laser piece, and adhere the entire piece with photos to the page.
4. Use a Gold Dual-Tip Pen to add detail.
5. Add flowers from the All My Love Embellishments, acorn stickers from the Hello, Autumn Stickers, and a title from the Hello, Autumn Embellishments.

My second layout features a laser piece from the Croptoberfest Laser Paper. This piece is pear green on one side and a light navy blue on the other side. The Croptoberfest Laser Paper coordinates perfectly with our Croptoberfest Kit and also the Hello, Autumn collection. However, I used it with the All my Love collection. Our collections always feature on trend colors, so they often coordinate with each other and are easy to mix and match.

To Make My Layout:
1. Use the Original Border Maker System with the Infinity Border Maker Cartridge to punch two borders from the rust colored All My Love Paper, and adhere to the left and top sides as shown.
2. Adhere photos and a All My Love Variety Mat to the backside of the Croptoberfest Laser Paper piece. Crop photo as needed. Also add some small pieces of the rust colored All My Love Paper behind the cut out leaf pieces. Adhere entire piece to a sheet of All My Love Paper.
3. Rub the edge of a Brown Dot Pen or Brown Dual-Tip Pen around the edges of All My Love Foiled Flower Embellishments. Adhere embellishments to the page.
4. Rub the edge of a Brown Dot Pen or Brown Dual-Tip Pen around the edge of the page.

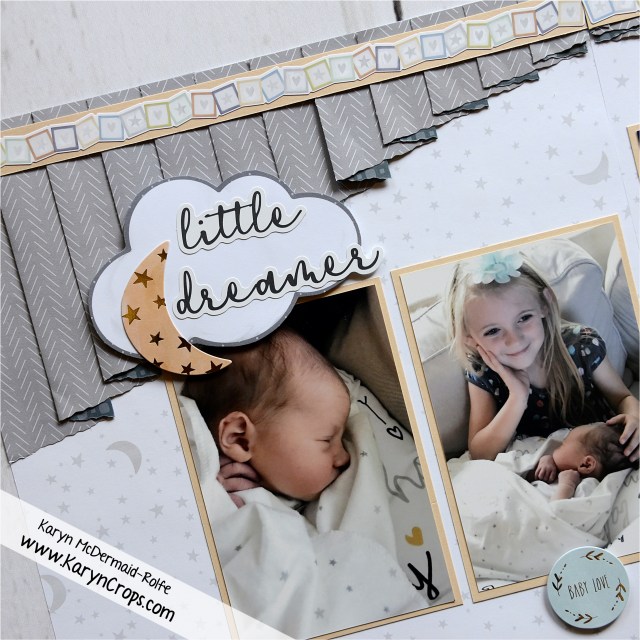
For my final layout, I used a second laser piece from the Croptoberfest Laser Paper. (The laser paper packs each come with three pieces.) I used the blue side, but the back side is in shades of red. As with the previous piece, this piece coordinates with the Croptoberfest Kit and the Hello, Autumn Collection. But instead, I used it with the Little Dreamer Collection. As I mentioned before, many of our collections coordinate and the pieces can be used inter-changeably. For my layout, I cut small squares from Little Dreamer Paper and adhered the pieces behind the laser piece to create a sweet baby quilt background for my photos.

To Make My Layout:
1. Cut small squares from Little Dreamer Paper and Little Dreamer Variety Mats. Adhere pieces behind the laser piece.
2. Use the Custom Cutting System with the Oval and Circle Cutting Patterns to cut photos and a Little Dreamer Variety Mat. Adhere photos and the journaling mat behind the laser piece.
3. Use Foam Squares to adhere Little Dreamer Embellishments.
You can simply use the laser paper as it is to create a fast and easy layout. Or you can do as I did and add additional paper, stickers and embellishments to make a more decorate layout. You’ll find all of the materials that I used for these layouts on my Creative Memories website link.
Happy Scrapping!
Karyn