I’m back with a few more layouts using the Seasons Greetings Collection from Creative Memories. This collection has been selling so well that it’s already in low supply and has been moved to the GOING GONE section of the CM website, and unfortunately some are no longer available. Please order these materials now while they’re still available.

This vintage-inspired collection reminds me of a cross-stitch sampler that my mother hangs in her home during the winter months. The sampler has a motif similar to the paper above with houses and churches on snow-covered hills with the saying, “Over the hills and through the woods to Grandmother’s house we go.” My layout above features the Rolling Hills Border Maker Cartridge that was so popular that it quickly sold out. However, CM has ordered more in a limited supply and expects it to be available again later in the winter. Watch for it’s arrival as it will likely sell out quickly when it returns.

To make my page, cut a piece of the green hounds-tooth paper to 12″ x 4-1/4″ and punch the top edge using the Original Border Maker System with the Rolling Hills Cartridge. Use the 12″ Decorative Trimmer to cut a swell edge on a strip of 12″ x 3″ house print paper. Cut two 4-1/4″ x 6-1/4″ photo mats from the red patterned paper. I embellished my page with a title sticker adhered with Foam Squares, a bow embellishment, and bells from the Seasons Greetings Laser But Borders.

The Seasons Greetings Laser Cut Borders are an absolute must-have item. They are exquisitely cut with incredibly fine detail. Each pack contains one of each of the borders above. For my layout, I cut apart the row of bells to make the border go further. I’ll make my layout into a double-page spread and will use the remaining bows on the second page.

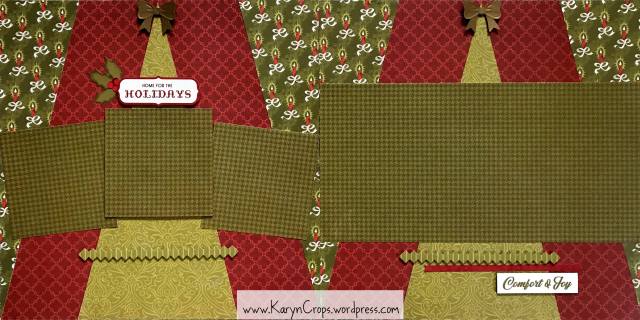
My second layout again features the Rolling Hills Border Cartridge and also the Midnight Star Border Cartridge. These two cartridges pair together so well! To create this layout, start by cutting out the center of a piece of 12″ x 12″ Red Cardstock to use as the base. Cut a piece of the cream star paper to 11-1/2″ x 7″ and punch the top edge using the Original Border Maker System with Midnight Star Cartridge. Cut a piece of Bronze Cardstock to 11-1/2″ x 1-1/4″ and adhere underneath the punched stars. Adhere this piece to the bottom of your page leaving a 1/4″ border of the Red Cardstock. Add a 11-1/2″ x 4-1/2″ piece of green hounds-tooth paper to the top part of the page.

Punch the green damask pattered paper with the Border Maker System and Rolling Hills Cartridge and cut off of the paper at 11-1/5″ x 1-3/4″. Cut a 1/2″ strip of green hounds-tooth paper and layer these two pieces on the bottom of your layout. I double-matted my photos with Red and Bronze Cardstock and adorned the page with Seasons Greetings Stickers and Embellishments. From Red Cardstock, I punched two bows using the new Embossed Bow Punch and added detail to the embossed parts using a Gold Dual-Tip Pen. I adhered the bows to the tops of my photos with Foam Squares.

A piece of wood-patterned paper from the CM Timber Paper Pack is the base of the layout above. (I love to mix the Timber Paper with all of our other collections!) You can create my fun window effect by using a frame from the Seasons Greetings Embellishments, a Variety Mat as the background sky, and snow white hills punched with the Rolling Hills Border Maker Cartridge. Cut the beard from the Santa sticker and adhere it to the window frame using Foam Squares and add a few word title stickers.

I adhered the Christmas lights laser cut border in three places behind the popped up bow punch-outs. This gives the lights the look of being strung and hanging across the page. I cut a Variety Mat into strips to use behind my photos and another Variety Mat as my journaling box. I added stickers with Foam Squares to the bottom of the layout and cut my photos to fit.

You may have already seen my last layout as I shared it last week at Creative Life Scrapbooking on Facebook. This layout is made of three strips from the Seasons Greetings Paper Pack. The top strip is 11-1/2″ wide and punched with the Original Border Maker with the Garland Cartridge and cut off at 1″. The middle strip is 11-1/2″ x 4-1/2″, and the bottom strip is 11-1/2″ x 5-1/2″ and punched again with the Border Maker with Garland Cartridge. (The Garland Cartridge is currently sold out but will be returning to the CM Product Line later this winter. When it returns, it will be in limited quantity – so plan to purchase it quickly.)

I matted my title mat and photos with 6-1/8″ x 4-1/8″ mats cut from Bronze Cardstock. I also adhered 1/4″ strips of Bronze Cardstock over the seams of the paper strips and adhered the cardinal and poinsettia stickers with Foam Squares.
Please purchase the Seasons Greetings items now as they are in limited supply. Orders placed on my website through noon on December 14th will have a chance to win a GOLDEN TICKET Prize!
All of my best wishes for a very Merry Christmas season!
Karyn