Seasons Greetings 1-2-3 Page Layouts

The time from Thanksgiving through New Year’s blends into one long holiday-celebrating season for me!  Over the past 17 years, holding my annual Creative Memories Holiday Open House has become one of my favorite holiday traditions.  I love opening my home to my loyal scrapbooking friends and showering them with special offers, make-n-takes, and holiday scrapbooking inspiration!


My very talented friend, Noreen Smith, graciously shared her new 1-2-3 Page Sketch with me, and I offered the layouts below as a workshop option at my Holiday Open House last weekend.  And I’m so excited today to be posting my blog in tandem with Noreen!  Please visit Noreen’s blog, Organized and Creative Mom to see her page sketch with cutting guide to make these layouts.

KarynCropsWordpressSeasonsGreetings123-1

For the past 2-1/2 years, I’ve been hosting an almost monthly Crop Club where we use one of Noreen’s wonderful 1-2-3 Page Sketches, one pack of paper and one pack of stickers or embellishments to make 3 double-page layouts. Sometimes I’ll add a sheet or two or three of solid cardstock if needed, and I also try to incorporate the newest CM tools. If you search my blog, you’ll find a few examples of some of the layouts that we’ve created in the past.  If you would like to join my Crop Club via long-distance, just send me an email and I’m glad to mail the materials to you.

KarynCropsWordpressSeasonsGreetings123-2

I was so excited to play with Noreen’s new sketch that focuses on large triangles to make beautiful Christmas trees!  As with all of her 1-2-3 Sketches, this was quick and easy to cut and assemble.  I used the new Seasons Greetings Paper and Stickers from Creative Memories and was quite pleased with my results. I love the warm and cozy retro Christmas aesthetic of the new Seasons Greetings materials!

KarynCropsWordpressSeasonsGreetings123-3

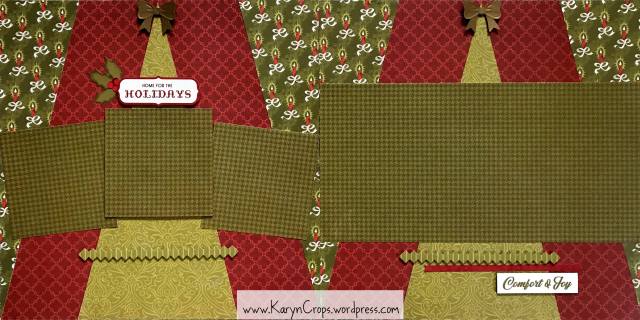
In addition to the Seasons Greetings paper and stickers, I used red and bronze cardstock for the bows that adorn the tops of my trees. I punched the bows with the new Embossed Bow Punch from CM and adhered the bows with Foam Squares.  I also adhered most of the stickers with Foam Squares and also the center photo mat on the layout above.  I love how Foam Squares add extra dimension and pop to our pages!

I had these layouts on display at my Holiday Open House and almost everyone who attended loved the pages and ended up purchasing the materials.  I hope that you love them too!  Please visit Noreen at Organized and Creative Mom for a copy of the 1-2-3 Sketch and Cutting Guide.

And if you’re in the U.S. and would like to purchase any of the tools or materials that I used, please visit my CM website.  If you order now through noon on November 30th, you can take advantage of the great Black Friday/Cyber Monday Promo that Creative Memories is offering.  Please note that the freebies are available while supplies last, so please order sooner than later.   Click here to order.

d7e6500e-4c0d-475d-bb38-9604e2d1cc3d

Happy Scrapping!

Signature


Secret Garden Scrapbook Layouts

Oh my goodness!  The new Secret Garden Collection from Creative Memories just might be their most beautiful collection yet!  It’s full of soft watercolor designs in shades of purple and teal.  The Fast2Fab Album with Pre-Designed Pages is absolutely stunning, and has received rave reviews from my customers.  At my recent weekend retreat, I sold 6 of the Fast2Fab Albums!  Personally, I love the Secret Garden Stickers most of all.  The sticker pack is full of lovely floral arrangements and sweet sentiments that are perfect for adorning pretty pages and cards!

We used the Secret Garden Paper and Stickers at my Crop Club last month.  At Crop Club, we use one page sketch, one pack of paper, one pack of stickers or embellishments, and some cardstock to make three double-page layouts.  Please contact me if you live in the Champaign-Urbana, Illinois area and would like to attend my Crop Club.  Or contact me if you’re interested in participating in my Crop Club by mail and would like to purchase my Secret Garden Crop Club Kit.  Below are the three layouts that can be created from the kit.

KarynCropsWordpressSecretGardenCropClubPages - Page 055

We used a 1-2-3 Page Sketch created by my friend, Noreen Smith.  Noreen has created a series of simple sketches that require only three cuts from one sheet of designer paper, and she shares some of these sketches on her blog, Organized & Creative Mom.  She has recently created an e-book of sketches that you can purchase from her blog.

The first layout is adorned with Secret Garden Stickers and also punch outs from CM’s new Double Heart Punch and borders punched with the Doily Border Punch.  The corners of the journaling box were punched with CM’s new 4-Way Heart & Stars Corner and Hole Punch.

KarynCropsWordpressSecretGardenCropClubPages - Page 057

My second layout features a bottom border punched with the Original Border Maker System and the Picket Fence Cartridge.  The Picket Fence Cartridge is one of three cartridges that come with the system when purchased.  A thin 12″ x 5/8″ strip of designer paper was threaded through the picket fence to create a ribbon effect.

I also included a few hearts from the Double Heart Punch and another journaling box with corners punched with the 4-Way Heart & Stars Corner and Hole Punch.


KarynCropsWordpressSecretGardenCropClubPages - Page 056

My third layout features a lovely border that I created with the recently sold-out Teardrop Lattice Border Punch.  I punched one border and cut it in half lengthwise and adhered each half to each page and topped them with border stickers adhered with Foam Squares. (This is a good reminder that CM’s punches and cartridges for the Original Border Maker System are considered limited edition items and are only available in a set quantity.  These items are projected to stay in inventory for 3-12 months, but some sell out quickly.)

On all three of my layouts, you’ll notice that I adhered most of the flower, butterfly and title stickers with Foam Squares.  I love the added dimension that the Foam Squares provide to my pages.

You’ll also notice that all three layouts feature a different way to arrange five 4″ x 6″ and 6″ x 4″ photos.  However, you can crop your photos into smaller sizes and arrange them to your liking.

I love all three of these layouts and can’t decide which is my favorite.  Which one do you like best?  Please leave me a comment – I would love to hear from you!

I look forward to making and sharing more pretty pages with this beautiful collection!  Please contact me if you’re interested in purchasing the materials to create these layouts.

Happy Scrapping!

Signature

P.S.  You might like to join my private Facebook Group, Karyn’s Croppers.  I”m running a summer special that you won’t want to miss!


Christmas Past Crop Club

watermarks-page-003

I hold a monthly Crop Club where we gather to make 3 double-page layouts using one page sketch, one pack of paper and one pack of embellishments.  Attendees only bring a few basic tools, and I provide CM’s newest tools for everyone to try.

In November, we made pages using our new Creative Memories Christmas Past Paper and Embellishments and the page sketch below by my friend, Noreen Smith.  You can download this sketch with instructions and also view a video demonstration on Noreen’s Blog, Organized & Creative Mom.

cropclub7christmaspastsketch

This sketch made a super cute Halloween page and also beautiful Christmas pages.  I incorporated our Garden Vine Punch and our new Snowflake Chain Cartridge for our Border Maker System on the layout below.  I also added a photo mat from Beige Cardstock to the first page in order to have some of the beige color on both pages.  It’s hard to see in the photo, but I did pen stitching around the reindeer embellishment to make it pop.  I skipped journaling on these pages, but will add journaling to the next layouts.

2-page-watermarks-page-003

On the pages below, I added photo mats and narrow strips from our Gold Shimmer Cardstock.  I made the photo mat on the second page into a ribbon.

2-page-watermarks-page-004

On the layout below, I added some leave embellishments punched from our Silver Shimmer Cardstock with our Maple Leaf and Leaf Trio Punches.  These silver shimmer pieces really help to brighten up these pages.

2-page-watermarks-page-002

Please contact me or visit my CM website to purchase any of these products.  We’re taking a break from Crop Club in December, but will start back up in January.  Please contact me if you’re in the Champaign-Urbana area and would like to join us.

Cheers!
Karyn


Painted Harvest Crop Club

paintedharvest1

We used the new Painted Harvest Paper and Embellishments, Garden Vine Border Punch, and Midnight Star Border Maker Cartridge from Creative Memories at our October Crop Club session.  This collection is full of vibrant prints and lovely embellishments that are perfect for autumn photos.

paintedharvest2

We used the sketch below from my friend, Noreen Smith, to make three double-page layouts.  We opted to add an additional photo to each page.

cropclub6paintedharvestsketch

watermarksdoublepage-page-001

I used the new Ruby ABC/123 Stickers for the Title on this layout.  I also used a small heart punch and scrap paper to make the pumpkin embellishments.  The Garden Vine border was punched from Evergreen Cardstock.

watermarksdoublepage-page-002

watermarksdoublepage-page-003

That’s our new Peacock Cardstock on these last pages – such a great color!  The peacock borders were punched with our Original Border Maker System and new Midnight Star Border Maker Cartridge.  We did a bit of piecing in order to get a strip of the wood-grained paper on each end.

To see or purchase any of the products used, please visit my CM website.

Happy Fall!

Karyn

September Crop Club

2-page-watermarks-page-003

At my September Crop Club, we made three double-page layouts using the same page sketch, one pack of Denim Blues Paper, one pack of Denim Blues Embellishments and one sheet of white cardstock.  We also used our new Lace Scallop and Circle Weave Border Maker Cartridges and our new Shooting Star Punch.  Our Denim Blues ABC/123 Stickers were an additional item that could be added.  Please contact me to purchase this kit.

cropclubsept16

We used this page sketch that my friend, Noreen Smith, designed for Creative Memories.

2-page-watermarks-page-003


This page features our Lace Scallop Border Maker Cartridge and a mixture of the flower and button embellishments for very sweet and feminine look.  It’s hard to see, but the background paper features tiny light blue dots on a white background.

2-page-watermarks-page-002

For a more masculine look, I used a large square in the background instead of a circle and also featured our new Circle Weave Border Maker Cartridge and the button embellishments.  Our new Repositionable Tape Runner Refill was perfect for adhering the delicate Lace Scallop and Circle Weave borders!

2-page-watermarks-page-001

This fun and spirited layout features our new Shooting Star Punch.  The bottom strips with the stars were cut from the backside of the background papers.  After cutting off the strips, I “taped” them back to the background papers with the striped strips.  The white letter stickers are an old CM product.

August Crop Club

2-page-watermarks-page-012


For this month’s Crop Club, I used our new Soiree Paper Pack and Soiree Embellishments.  This collection is full of bright fun prints and super cute stickers and embellishments.  It’s great for photos from birthdays or any sort of celebration.  I used Noreen Smith‘s page sketch below as the layout for these pages.

March 2013 SOTM

This sketch does not have a cutting guide, but the concept is simple.  From your sheet of designer paper, punch two borders and then cut the remaining portion in half.

2-page-watermarks-page-011

For this layout, I punched borders with our Original Border Maker and Crown Cartridge on both the right and left sides of the blue paper.  I then cut the blue paper in half.  The white borders punched with our Ocean Waves Cartridge add extra pizzazz.


2-page-watermarks-page-012

I used our Original Border Maker with our new Lace Scallop Cartridge to punch two borders from the pink floral paper.  I used the reverse side of the borders which is green with a slight print.  To help the green borders really pop, I layered raspberry lace scallop borders behind them.

2-page-watermarks-page-013

For this layout, I cut the green print paper in half.  I arranged the pieces vertically on the pages in order to follow the pattern on the green paper.  Two raspberry pink ocean waves borders and some embellishments complete the layout.


July Crop Club

Our new Cool Serenity Collection is perfect for beach, lake and river photos.  The shades of blue and green are beautiful, and the embellishments are some of my favorites.  I used this collection and the page sketch below from Noreen Smith for my July Crop Club.

Jan2016Sketch

Jan2016CuttingGuide


2-page-watermarks-page-007

The border on this layout was made with our Original Border Maker System with our new Grass and Ocean Waves Cartridges.


2-page-watermarks-page-008

I used Foam Squares to create the layered Ocean Waves border at the bottoms of these pages.


2-page-watermarks-page-006

The grass border at the bottom was punched from the green cardstock in the Travel Solid 12×12 Cardstock Paper Pack. This pack of cardstock coordinates perfectly with the Cool Serenity Collection.

To purchase any of these items, please visit my CM website.  Through July 29th, receive $10 off of your online purchase by entering HEART10 in the Discount Codes box on the View Cart page.  To attend my next Crop Club workshop, please contact me.


June Crop Club

For my June Crop Club, we made three layouts using the same page sketch from Noreen Smith and our CM Hello Baby Boy Paper Pack.  The CM Mint ABC/123 Stickers and some solid cardstock completed the pages.  If you would like to purchase the materials with instructions to make these pages or attend my Crop Club, please contact me.

Feb20151

Noreen Smith‘s 1-2-3 Sketch

Feb20152

Noreen Smith‘s 1-2-3 Cutting Guide


2-page-watermarks-page-014

The faux chevron border on this layout was made by cutting 2″ squares in half diagonally and arranging as shown.  Additional clouds were punched with our Word Bubble Punch.

2-page-watermarks-page-012

To make the border, use our Original Border Maker with Chevron Cartridge to punch two borders from royal blue cardstock.  Cut the border in half to make the feather-like strips.

2-page-watermarks-page-013

The borders on this page were punched with our Original Border Maker with the Crown Cartridge.


One Layout Done 3 Ways

One layout done three ways! That’s what my Crop Club is all about! At my monthly Crop Club, we use one layout sketch and one pack of paper to make three different layouts. At each session, you’ll learn a new technique and use our newest tools. The fee includes all materials – you just bring a basic tool kit. A special thanks goes to my friend, Noreen Smith, who shares her layout sketches.

baby

For this example, I used paper from our CM Hello Baby Boy and Watercolor Love Paper Packs and embellishments from our Watercolor Love and Pastel 2 Embellishments.  Using the same layout sketch, we made the following three layouts at my first Crop Club using our Hello Baby Girl Paper Pack and some additional sheets of cardstock.


2-page-watermarks-page-012

The fancy border was punched with our new Decorative Arcs Punch.  The flowers were made by folding and cutting circles.  See the CM Blog for a video instruction on how to make the flowers.

2-page-watermarks-page-010

The cute borders were punched with our Original Border Maker System with our new Button Cartridge.  The strawberries are heart punch outs.

2-page-watermarks-page-011

The borders were punched with our Original Border Maker with our new Chevron Cartridge.  I love how the three layouts are made from the same paper pack but have very different looks.  Although these were made with our Hello Baby Girl Paper Pack, they are not baby pages.  (The designs on the backsides of some of these sheets are very cute baby motifs.)