Home-Bound Throw-Down Challenge – Week 5

Whew, April was a looong month!  For more reasons that one – huh?  But we made it through 5 weeks of self-quarantining and scrapbook challenges!  I’ve really enjoyed our Home-Bound Throw-Down, and I hope that you have also.  I’m a little sad to leave it behind, but I’m looking forward to new scrapping events and opportunities.  Please follow me on Facebook at Karyn’s Croppers to participate in my new Zoom classes on Thursdays in May and also our Karyn’s Croppers Virtual National Scrapbook Day workshop on Saturday, May 9th.

My 9th challenge for the Home-Bound Throw-Down features a way to use up scraps of paper and have with a combo of border punches and Border Maker cartridges.  I’m still using the Spring Medley collection from Creative Memories, and I must say that it’s one of my favorites from the past year.

KarynCropsHomeBoundThrowDown9&10 - Page 005

To make my layout:

1.  Cut strips of paper in varying widths and 1″ high.
2.  From cardstock, punch a variety of borders using border punches and the Original Border Maker System.  I used Navy, Cloud, Peacock and Deep Sea Green Cardstock with the Cable Chain and Spring Leaf Chain Border Maker Cartridges and the Flower Child, Songbirds, and Lace Trim Border Punches.
3.  Triple mat your photo to give it extra depth and dimension.
4.  Adhere Spring Medley Stickers and Embellishments with Foam Squares.


HomeBoundThrowDown#9
For my 10th and final Home-Bound Throw-Down challenge, I created another layout for my Covid-19 project.  This layout will feature a photo of my husband and me on our front porch.  As you might be aware, there is a movement that is encouraging folks to have family photos taken on front porches to document their experience sheltering at home.  Neighbors are taking photos for neighbors, and professional photographers are offering this service.  If you search Facebook and/or Instagram, you’ll find heartwarming to creatively hilarious family photos that document this time.  I haven’t yet decided what our pose might be, but I plan to ask our neighbor to take our photo soon.

KarynCropsHomeBoundThrowDown9&10 - Page 006

This layout features the NEW 12″ Trimmer Stamping Blade.  I can not sing enough good praises for the 12″ Trimmer from Creative Memories!  I’ve been scrapbooking for a long time, and this is the BEST trimmer that I’ve used.  If you haven’t yet seen the trimmer, please click on this link to view a video that describes it’s features and benefits.  In addition to a straight blade, we have currently have 7 specialty blades that cut a variety of patterns.  The new Stamping Blade cuts a postage stamp edge.

IMG_2277

To create my layout:

1.  Cut a variety of Spring Medley Designer Paper to 2″ x 4″ and 2″ x 1-1/2″ sizes using the  12″ Trimmer with the Stamping Blade.
2.  Decorate a 6-1/4″ x 4-1/4″ photo mat with punched pieces from the Branch Border Punch.  Adhere the branches with small Foam Squares cut in half.
3.  Create a bird’s nest by layering two pieces punched with the Pine Cone Punch and trimming with scissors to shape.  Use the Songbirds Border Punch to punch two birds, cut apart with scissors and adhere inside of the nest.
4.  Add a Spring Medley Variety Mat for journaling and Spring Medley Stickers with Foam Squares.  (I LOVE how the sentiments on these stickers are perfect for my porch photo!)

You may purchase any of the tools and/or materials that I used on my Creative Memories website.  (Please note that the Branch Border Punch and Pine Cone Punch are retired items.  But please contact me if you would like to purchase them as I have a few in my personal inventory.)

Have a lovely weekend!
Karyn


Home-Bound Throw-Down Challege – Week 4

Hello and welcome to the fourth week of my Home-Bound Throw-Down challenge!  I’m still using the Spring Medley collection from Creative Memories and really loving the fresh shades of blue and green.  Plus there’s a nice mix of small, large and tonal patterns.

I was inspired by the title “Living our best life right now” on the Variety Mat.  So I created a layout to document the ways that my husband and I are staying busy during the Covid-19 pandemic.  I was even able to persuade my husband to do his own journaling!  I added the “Rain or Shine” sticker to the “Love Grows” embellishment as it reminds me of our wedding vows, “for better for worse, in times of sickness or health…“.

KarynCropsApril2020 - Page 084

To create my layout:
1.  Use the Custom Cutting System with the smaller heart from the Gemstones Cutting Patterns to cut 5 hearts from patterned paper using the Green Blade on the outside edge.  Use the Red Blade on the outside edge to cut 3 hearts from light print paper, and adhere to three of the larger patterned hearts.
2.  Cut your photo and Variety Mat to 3″ x 3-3/4″.  Cut photo mats to 3-1/4″ x 4″.  Adhere.
3.  Add journaling, embellishments and stickers as shown.

KarynCropsApril2020 - Page 085

HomeBoundThrowDown#7

My next layout is simply a pretty page that features the new Spring Leaf Chain Border Maker Cartridge and Baroque Border Punch.  And I also used our new Dark Sea Green Cardstock.  For some of my past layouts, I used Navy Cardstock with the Spring Medley collection.  Cloud, Peacock, Beige and White Cardstock also look nice with this collection.

HomeBoundThrowDownPhotos#8 - Page 001

To make my layout:
1.  Cut six strips that measure 2″ x 6″ and adhere onto a 12″x 12″ sheet of designer paper.
2.  Use the Original Border Maker System with the Spring Leaf Chain Border Maker Cartridge to punch 3 borders from Dark Sea Green Cardstock and cut in half at 6″.  Adhere these pieces in-between the strips.
3.  From Dark Sea Green Cardstock, use the Baroque Border Punch to punch a border and adhere at the bottom of the strips.  Add a sticker strip to the top of the border piece.
4.  Add 4-1/4″ x 4-1/4″ photo mats from White Cardstock.
5.  Use the Custom Cutting System with the medium sized Circle Pattern and the Red Blade on the inside edge to cut a circular journaling box.
6.  Add stickers and embellishments with Foam Squares as shown.

HomeBoundThrowDownPhotos#8 - Page 002HomeBoundThrowDown#8

You can purchase any of the materials and tools that I used on my Creative Memories website. 

Make sure to check out the PJ Party virtual crop hosted on Facebook by Creative Life Scrapbooking today (April 24th)!  The fun begins at 4:00 EDT time, and I’m hosting the second hour.

I’ll be back next week with two more Home-Bound Throw-Down challenges!  Take care until then!

Karyn

Home-Bound Throw-Down Challenge – Week 3

Well, we made it through another week of self-isolation.  Congrats to us!  At this point, it’s somewhat beginning to feel almost normal.  Below is an excerpt from a post that I made to Karyn’s Croppers earlier in the week.

There’s no denying it – we’re living through a historic event. I like to think of my personal scrapbook albums as my diary, and I need to include the Covid-19 Pandemic in my scrapbook. There are different ways that we could approach this topic in our albums, and I encourage you to think about how you are going to document this time. After all, we are the memory keepers and storytellers.

I decided to do what I always do – take photos of my life. These photos will be of things that I’m doing now – photos of me and my husband and what we’re doing, photos of my garden, photos of food that I’m cooking, photos related to my CM business. So my photos and journaling will be a reflection of how the virus is impacting our daily life. These photos will show how our daily life has changed. Instead of photos of us out and about, there will be photos of us doing things at home. There will be photos of us wearing masks, washing groceries, and having zoom calls with friends and family. Absent will be photos of us with the kids and grandkids. I decided not to create a dedicated album to the virus but to rather just incorporate it into my annual chronological family album.

So with this in mind, my next challenges for our Home-Bound Throw-Down  feature layouts that you can use to document the Covid-19 pandemic in your albums.  But the layouts are versatile enough that you can use them for any of your photos.

HomeBoundThrowDown#5
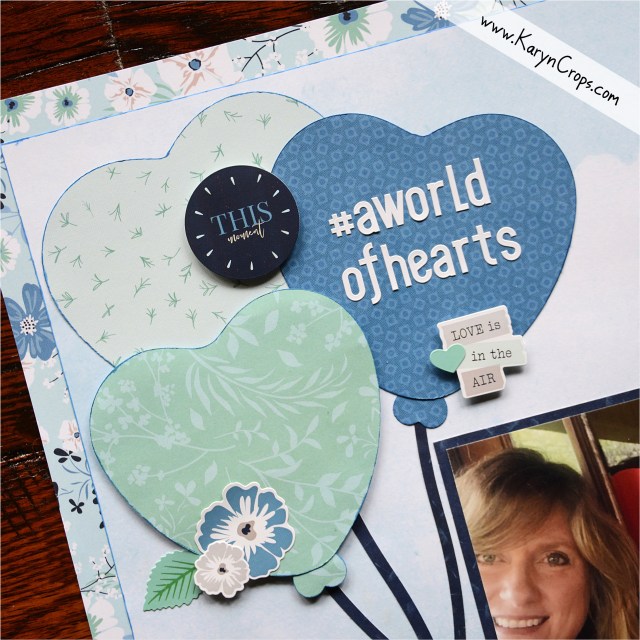
My example for this layout features a photo of my window display for #aworldofhearts.  A few weeks ago, a world-wide movement called #aworldofhearts was created to encourage everyone to decorate their front windows with hearts as a display of love, hope, and unity and also to thank essential workers.  Search for #aworldofhearts on Facebook, and you’ll find a page devoted to these creations.  They range from sweet and simple to incredibly elaborate.  Some are using sidewalk chalk and decorating their driveways and sidewalks too.  I wanted to remember this huge heartwarming gesture and created a layout to document it in my scrapbook.

HomeBoundThrowDown5Photo

I used designer paper, tone-on-tone paper and stickers from the very lovely Spring Medley collection from Creative Memoriesto create my layout.

1.  Cut a hollow frame from the floral paper.
2.  Cut the cloud paper to 11″ x 11″.  Rub the round-tip edge of a Dual-Tip Pen around the perimeter of the paper to create dimension and definition.  Adhere to the floral frame.
3.  Use the Custom Cutting System with the smaller heart pattern from the Gemstone Cutting Patterns and all three blades to cut and create balloons.  Use the old Small Heart Maker punch to create the bottom pieces of your balloons.  Rub the round-tip edge of a Dual-Tip Pen around the perimeter of the hearts to create dimension and definition.  Use the 12″ Decorative Trimmer to cut 1/8″ balloon strings.  Adhere the top balloon with Foam Squares.
3.  Add a title with White Sans Serif ABC/123 Stickers.  Add Spring Medley Stickers using Foam Squares and journaling to complete your page.

HomeBoundThrowDown5Photo2


HomeBoundThrowDown#6

When I get over-whelmed with the stress, anxiety and major disruptions that the Covid-19 pandemic has caused in my life, I like to remind myself that “things can always be worse”.  This has proven to be true in most of the bad times that I’ve experienced.  And despite the awfulness, there are always blessings to be counted.  So when I start feeling a little down about the current situation, I just remind myself of all the things for which I’m grateful.  I created the layout below as a reminder of some of my blessings during this pandemic.

HomeBoundThrowDown#6 - Page 082

Again I used paper, stickers and embellishments from the Spring Medley collection.  I printed my photos on my home computer in wallet size – 2-1/2″ x 3-1/4″ and matted them on Navy Cardstock.

1.  Use the Custom Cutting System with the larger heart pattern from the Gemstone Cutting Patterns and the Red Blade to cut hearts from the paper.  Use the Green Blade on the outside edge to cut hearts from Navy Cardstock.  Adhere the pieces and add faux pen stitching with a navy pen.
2.  Mat photos with 2-3/4″ x 3-1/2″ pieces of Navy Cardstock.
3.  Cut White Cardstock into 2-1/4″ x 1/2″ strips and add your blessings.
4.  Add a title with White Sans Serif ABC/123 Stickers.  Journal on a tag from the Spring Medley Embellishments.  Adhere the tag and floral stickers from the Spring Medley Stickers with Foam Squares.  Add faux pen stitching around the perimeter of your layout.

I hope that you have many blessings to count and record!  You may purchase any of the materials that I used on my Creative Memories website.  I’ll be back next week with two more layouts.

Have a nice weekend,
Karyn

Home-Bound Throw-Down Challenge – Week 2

Last week, I initiated my Home-Bound Throw-Down challenge on my private Facebook group, Karyn’s Croppers.  On Mondays and Fridays through April, I will be posting page challenges and asking my followers to create my layout and post their versions to Karyn’s Croppers to earn chances to win a prize.  I’ll also be sharing the layout challenges here on Karyn Crops on Fridays.

HomeBoundThrowDown#3

Our third Home-Bound Throw-Down challenge is to create a spring sampler.  I created mine as a decorative piece to hang on my old Everyday Display in my kitchen.  I used pieces from the new Spring Medley Designer Paper, Tone-on-Tone Paper, Variety Mats, Stickers and Embellishments and Navy Cardstock.  I also used the Songbirds Border Punch, the Tulips Border Punch and the Gum Leaf Punch.

Watermarks - Page 077

My background paper measures 12″ x 12″, and the other pieces measure:  10″ x 10″, 3-1/2″ x 3-1/8″ and 6″ x 3-1/8″.  I adhered the border pieces, stickers and embellishments with Foam Squares.  I finished the page by adding faux pen stitching to the rectangle pieces.

You can adapt this layout and include photos in any of the rectangular spaces.  You can also easily adapt it into a double-page spread.


For my fourth Home-Bound Throw-Down challenge, I created a double-page layout.  The layout features a wave cut that separates the rows of photos and paper pieces.  For my example, I created another spring layout.

HomeBoundThrowDown#4

I used paper and embellishments from CM’s old Mix and Match collection, White Cardstock and the Branch Border Punch to make my layout.  I used the 12″ Decorative Trimmer to cut a wave shape from the bottoms of the pieces on the first row and a wave shape from the tops of the pieces on the second row.

IMG_2039

To cut wave shapes from your photos and paper pieces:

1.  Take the photos and paper that will make up your first row and line them up on the trimmer (in the order that they will appear on your page) with the bottoms of the pieces a quarter inch past the right of the cutting groove.  The tops of the photos/papers will hang over the left side of the trimmer.  (See photo above.)
2.  Space the photos/papers apart a quarter inch on the trimmer base.  (See photo above.)
3.  Close the trimmer arm and apply pressure on the arm to keep your pieces from sliding.
4.  Cut.

IMG_2038
5. Take the photos and paper that will make up your second/bottom row and line them up on the trimmer (in the order that they will appear on your page) with the tops of the pieces a quarter inch past the left of the cutting groove.  The bottoms of the photos/papers will hang over the right side of the trimmer.  (See photo above.)
6.  Space the photos/papers apart a quarter inch on the trimmer base.  (See photo above.)
7.  Close the trimmer arm and apply pressure on the arm to keep your pieces from sliding.
8.  Cut.


KarynCropsHomeBoundThrowDown#4

I added journaling, sticker titles, flower embellishments and punched out branch pieces to decorate my pages.  I completed the layout with faux pen stitching around the perimeter.

KarynCropsHBTD4


You can purchase the 12″ Decorative Trimmer, Songbirds Border Punch, Tulips Border Punch, Gum Leaf Punch and the Spring Medley collection through my Creative Memories website link.

I hope that you all have a happy and blessed Easter on Sunday!  Please take photos of the not so usual way that you’ll celebrate the holiday this year.  I’ll be sharing some Easter layout ideas later in the month.

I’ll be back again next Friday with two more Home-Bound Throw-Down challenges!

Take care,
Karyn