Diagonal Punched Scrapbook Borders

I love scrapbooking techniques that are quick and easy, but yet create beautiful results! And that perfectly describes the technique that I’m sharing today. This technique only requires 2 sheets of paper, a few embellishments and a chain style border maker cartridge.

I used the Original Border Maker System from Creative Memories to punch a portion of the top sheet of designer paper and then reassembled the sheet with the borders. For my first layout, I alternated the Brocade Chain and the Wispy Chain Border Maker Cartridges and used paper, stickers, embellishments and a variety mat from the Something Blue Collection.

For my second layout, I used the new Bears Chain Border Maker Cartridge with papers and embellishments from the Welcome Baby Collection. I also added flowers and leaves from the Floral Essential Yellow and Teal Embellishments (a recent promotion offering). I love how we can easily mix and match across many of the collections by Creative Memories!

For step-by-step instructions, please view my YouTube video where I provide the measurements for cutting a triangle from the top sheet and also tips on selecting papers and border maker cartridges.

Please also subscribe to my YouTube channel and click on the bell icon to receive notifications when I add new videos.

You may purchase the tools and materials that I used for both layouts through my Creative Memories website link. I appreciate your purchases and offer a generous Customer Rewards Program!


Please consider joining me for two different virtual events in April. On April 20th, I’ll be hosting my Virtual National Scrapbook Day Workshop on Zoom and sharing my own exclusive layout designs. On April 26th, my scrappy friends and I at Creative Life Scrapbooking will be hosting our PJ Party Virtual Crop on Zoom. Both events will be recorded if the dates are bad for you. Please use the links below to see more information about the events and to register.


Thanks so much for visiting with me today!
Karyn

Unique Use for the Spring Leaves Frame Punch

I love to make pretty pages, and today I’m sharing a beauty! I used the new Spring Leaves Frame Punch and the Something Blue Collection from Creative Memories for my monthly technique layout and challenge.

We can use the frame punches to punch square and rectangular frames and borders. But we can also use them to punch inside frames! I started with 6″ x 6″ squares that I cut into hollow frames and then punched with the Spring Leaves Frame Punch. For my third frame, I used White Shimmer Cardstock as a pretty shimmery accent. Please note that this technique will only work with designer papers and thin shimmer cardstocks. Cardstock and heavier papers will likely jam your punch. This technique will also work with border punches in addition to frame punches.

For step-by-step instructions and a demo, please view my YouTube video. While you’re on YouTube, please also subscribe to my channel and click on the bell icon to receive notices when I add new videos.

I begin my video with a look at the very lovely Something Blue Collection that is the new wedding collection from Creative Memories. In the video, I show how many of the pieces can also be used for other types of layouts.


Creative Memories is offering FREE SHIPPING until noon CT on Friday, March 8th! Now is a great time to purchase the Spring Leaves Frame Punch and Something Blue Collection along with our new spring collection, Birds & Blooms!

Don’t forget to add the NSD 2024 Customer Bundle to your cart to make my exclusive National Scrapbook Day layouts.


I also invite you to join me for my Virtual National Scrapbook Day Workshop on Saturday, April 20th. I’ll be sharing recorded video instructions and printable handouts for my own exclusive National Scrapbook Day layouts. We’ll meet on Zoom on April 20th to create the layouts together. If you can’t be on Zoom, you will receive access to the recorded videos. My layouts are beautifully layered and detailed and contain some unique features. I will only share these layouts through my event.

Thanks so much for visiting with me today! Happy Scrapping!
Karyn

Pretty Punched Scrapbook Borders

Creative Memories offers some of the best scrapbooking tools on the market. Some of the tools stay constant in the product line while others retire and are replaced with new tools.  Over the years, I’ve collected a LARGE assortment of Creative Memories punches and border maker cartridges, and I LOVE to find new ways to use them! You’ll love the technique that I used to make these two layouts as it can be used with many different border punches, frame punches and border maker cartridges!

For my first layout, I used the Original Border Maker System with the Brocade Chain Border Maker Cartridge to create my pretty punched borders. I used papers and stickers from the new Sweet on You Collection. 

For my second layout, I used the Damask Flourish Frame Punch and papers and stickers from the Painted Garden Collection. 

I LOVE how many different punches and cartridges can be used with this technique to create totally different looks!

To create the border pieces for both of the layouts, cut squares to 3″ x 3″, fold the squares into triangles, and then punch the triangles. You can use the punched pieces to create single borders or double borders as I did. Or you can add the pieces around all four sides of a page for yet a different look.

To view a step-by-step demonstration, please click here to see my YouTube video. Thank you also for subscribing to my YouTube channel. 


All of the tools and materials that I used for these layouts can be ordered through my Creative Memories website link. Thank you so much for your purchases!


UP-COMING EVENTS:

Please see the Creative Life Scrapbooking website for information about our PJ Party Virtual Crops. Our first Party of 2024 will begin on January 26th (all Zoom sessions are recorded.). You can register for all 4 of our 2024 PJ Parties at a discounted price for a limited time.

Please click here to see the Creative Life Scrapbooking website.


Camp Crop-A-Lot Week Scrapbooking Reteat
February 22nd – 25th, 2024

I have a few spaces remaining for my February Weekend Scrapbooking Retreat. Please register asap to save your spot! Please click here to see the registration form for complete information.


Karyn’s Croppers Quarterly Kit Club
Please contact me ASAP to join my Quarterly Kit Club! (Please use the Contact Me tab at the top of this page.)

Happy Scrapping!
Karyn

Double Punched Borders with the Creative Memories Border Maker System

As we roll into summer, I’ve been playing with some of the Creative Memories collections that are great for scrapbooking vacation memories. We have a general travel collection (Wanderlust) but also many specific collections that cover so many different destinations.

Water: Serene Waters
Tropical: Tropic Time
National Parks: Leave Nothing Behind
Amusement Parks: Sparks of Magic
Camping: Set Up Camp
Zoos: What a Zoo Too!
U.S. Regions and Cities: Wide Open Spaces, Florida, New York, Washington DC, and New Orleans International: United Kingdom, Italy, Mexico and Canada

We even have a collection if you’ll be staying home this summer (Staycation)!

For my first layout, I used the Tropic Time Collection to preserve memories from a Florida vacation. I also used the Monstera Leaves Border Punch and the Original Border Maker System with the Ancient Key Border Maker Cartridge.

I used the 12″ Trimmer with the Perforating Blade to score my paper at 3″. I turned the paper on it’s side and scored it again at 3″. I then folded the paper on the perforation marks and used the Original Border Maker System with the Ancient Key Border Maker Cartridge to punch borders on both folded sides.

For full instructions and to see a step-by-step demonstration, please view my video on my YouTube channel.

I used the same technique to create a second layout with some photos of hiking in the Great Smoky Mountains National Park. I used the Set Up Camp Collection and the Chevron Arrows Border Maker Cartridge for this page.

This technique will work with any knock-out style border maker cartridge. Please see my video for instructions. I would also appreciate your subscription to my YouTube channel! If you click on the bell icon, you will receive a notification whenever I add a new video.

You may purchase all of the tools and materials that I used for these layouts through my Creative Memories website link. I appreciate your purchases and offer a generous Customer Rewards Program!

Happy Scrapping!
Karyn

Painted Garden Spring Scrapbook Layouts

Although it was late coming this year, I’ve been enjoying our spring weather and the spring blooms in my garden. My peonies just finished blooming, but I can enjoy photos of them year-round in my scrapbook album!

The Painted Garden Collection from Creative Memories is especially beautiful and is a great complement to our spring photographs! Please see my blog post from May 2nd to view a layout using this collection.

And I also used the Painted Garden Collection to create the two layouts below for Creative Life Scrapbooking.

To embellish my first layout, I used a mix of the Painted Garden Embellishments, Stickers and Variety Mats. I also used the Rustic Fence Border Punch and the Floral Peaks Border Punch. I used the Original Border Maker System with the Citrus Slice Border Maker Cartridge to create the wheel for my garden wheelbarrow.

To purchase a printable PDF handout of these instructions, please see the Creative Life Scrapbooking website.


For my second layout, I created a beautiful border treatment by creating tiny envelopes and filling them with embellishments. The Painted Garden Embellishments are my favorite item in this collection. The pack is full of flowers, berries, butterflies, bees and humming birds! I used the Envelope & Bow Creator from Creative Memories to create my envelopes. This is a nifty tool for creating envelopes of all sizes and also bows!

To purchase a printable PDF handout of these instructions, please see the Creative Life Scrapbooking website.

My instructions include a video demonstration of how to use the Envelope & Bow Creator to make the envelopes and also written instructions for creating the envelopes with our 12-Inch Trimmer instead.

I offer a generous Customer Rewards Program and appreciation your purchases through my Creative Memories website link!

Happy Scrapping!
Karyn

2023 National Scrapbook Day Layout

Happy National Scrapbook Day! It’s a day to celebrate our shared love of memory keeping and scrapbooking! Did you know that Creative Memories established the first National Scrapbook Day in 1994? It’s amazing to think about the number of photographs and family memories preserved in albums since that time!

To celebrate, Creative Memories releases a special National Scrapbook Day Kit each year. In addition to the NSD Kit, CM usually offers accompanying cardstock, embellishments, and tools. Some of our 2023 items are sold out, but the kit and a few other items are still available for purchase.

To create my layout above, I used materials from the 2023 NSD Kit with the Citrus Slice Border Maker Cartridge and Mandala Burst Border Punch. I appreciate your purchases through my Creative Memories website link, and I offer a generous Customer Rewards Program.

To Create My First Page:

  1. Cut a 1/2″ x 12″ strip from Canary Cardstock and save for the second page. Cut (2) 4″ x 6″ photo mats and set aside.
  2. Use the Custom Cutting System with the #2 Circle Pattern and Blue Blade on the inside edge to cut (11) circles from the Canary Cardstock.
  3. Use the Mandala Burst Border Punch to punch (2) borders from the Dark Green Cardstock. Cut off of the cardstock at 1-1/2″. Punch a single mandala piece also from Dark Green Cardstock and cut off of the cardstock at 1-1/2″. Use All-Purpose Scissors to cut apart the single mandalas from the borders.
  4. Adhere the single mandala pieces onto the canary circles.
  5. Use the Custom Cutting System with the #3 Circle Pattern and Red Blade on the inside edge to cut (6) circles from the yellow sun paper. Cut the circles in half. Adhere the layered canary/mandala pieces onto the yellow sun semi-circles.
  6. Use the Custom Cutting System with the Jumbo Circle Pattern and Red Blade on the inside edge to cut a circle from the center of a sheet of the lemon/lime paper.
  7. Adhere (8) of the yellow sun semi-circles underneath the teal side of the cut-out circle. Adhere the teal circle to the other sheet of the lemon/lime paper.
  8. Adhere the two photo mats to the layout. Trim and adhere border stickers to the top and bottom of the mats.
  9. Add stickers with Foam Squares as shown. Use a Green Dual-Tip Pen to add faux stitching as shown.

To Create the Second Page:

  1. Cut striped paper to 12″ x 9″. Stripes should be running vertical, so cut in the horizontal position.
  2. Use the Border Maker System with the Citrus Slice Border Maker Cartridge to punch (2) borders from Dark Green Cardstock. Cut off of the cardstock at 1″ and adhere to the top and bottom of the striped piece.
  3. Adhere the striped sheet to the sheet of lemon/lime paper with the circle cut out of the center. Make sure to only put adhesive on the edges of the striped piece.
  4. Adhere the 12″ x 1/2″ strip of Canary Cardstock to the top of the bottom border.
  5. Cut (3) 3-1/2″ x 5-1/2″ photo mats from the yellow sun paper and adhere as shown.
  6. Adhere (3) of the semi-circle pieces to the tops of the photo mats. Adhere the reverse side of one semi-circle as shown for a journaling box.
  7. Add stickers with Foam Squares as shown. Use a Green Dual-Tip Pen to add faux stitching as shown.

If you would like a printable PDF Handout of these instructions, please join my private Facebook group, Karyn’s Croppers, and look in the FILES section. Click here to join Karyn’s Croppers.

If you like this layout, you’re going to LOVE the exclusive layouts that I created for my Virtual National Scrapbook Day Workshop! You can purchase access to the instructional handouts and videos for these layouts. In addition to the NSD Kit, I used the NSD Cardstock Sampler Pack, NSD Laser Bundle and NSD Mini Embellishments. You can substitute with other materials.

2023 National Scrapbook Day Layout Instructions

You will receive access to handouts and instructional videos to create 8 single page layouts. The layouts pair perfectly to create double-page layouts if desired. After you purchase, you will receive an email within 24 hours with instructions for accessing the materials. I ask that these layouts are not shared with others and are not shared on social media including Pinterest. No refunds.

$20.00

Happy Scrapping!
Karyn

Punched Swirl Circles with Creative Memories Border Maker System

Yay, it’s May – one of my favorite months of the year! I love the beautiful weather and the early summer blooms in my garden! For my monthly Technique Layout and Challenge, I’m featuring an adaptation of a layout that I created for the Creative Memories Blog in 2016! For that layout, I used punched pieces to decorate circles to create a swirling pattern across a double-page layout. For my new layouts, I punched circles with the Original Border Maker System with knock-out style cartridges to create a swirling pattern.

Did you know that Creative Memories offers three kinds of border maker cartridges?

Chain Style: Punches out a chain pattern that falls off of your paper when punched.
Edge Style: Punches the edge of your paper. You can use your punched paper or cut off the decorative edge to create a border.
Knock-Out Style: Punches a design from the paper that doesn’t extend to the edge.

To create my layout, I used the Custom Cutting System to cut three different sizes of circles, and then I cut those circles in half. I used the Original Border Maker System with the Zebra Stripe Border Maker Cartridge to punch around the edges of the smallest semi-circles.

For this layout, I used the super cute What a Zoo Too! Collection. The What a Zoo Too! Stickers are especially adorable, and I also love the coordinating What a Zoo Too! ABC Letter Stickers!

For my second layout, I used the lovely Painted Garden Collection with the retired Butterflies Border Maker Cartridge and the exclusive Ladybugs Punch that was part of a recent promotion by Creative Memories. I added a journaling box to this layout and also a border punched with the Original Border Maker System with exclusive Woven Scallop Border Maker Cartridge. (Please contact me if you would like to purchase the Woven Scallop BMC.)

To see a step-by-step demonstration of how to create this layout, please see my YouTube video. If you subscribe to my YouTube Channel, you’ll receive a notification when I post a new video.

You may purchase most of the tools and materials that I used through my Creative Memories website link. I so appreciate your purchases and offer a generous Customer Rewards Program.

For an entry into my Monthly Door Prize Drawing, please use this technique to create a layout and share a photo of your layout in my private Facebook group, Karyn’s Croppers. Please ADD your photo to the #TechniqueTue 47 Album where you’ll be able to see versions shared by other croppers. While you’re in the ALBUM section of Karyn’s Croppers, take a peek at the 46 other technique albums!

Happy Scrapping!
Karyn

Folded Hexagon Frames Scrapbook Layout

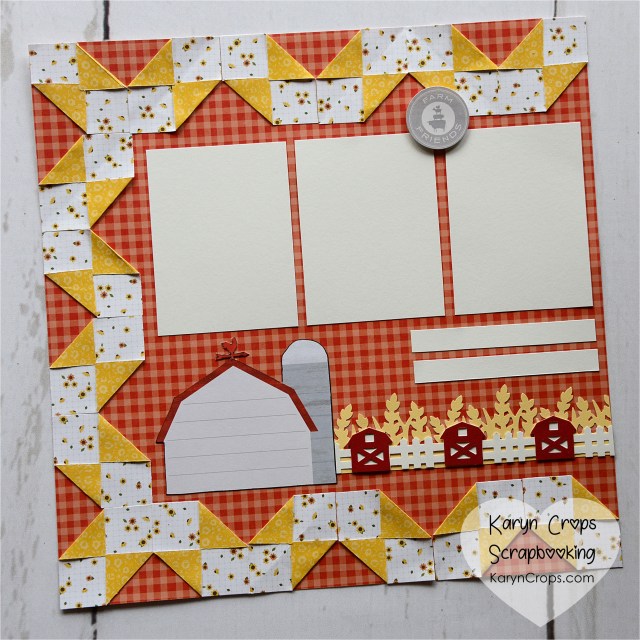
My monthly technique layout features folded squares that create elongated hexagon shapes that show off both sides of the designer paper. I arranged the hexagons around the perimeter of my layouts to create unique patterns.

For my first page, I used the On the Farm Paper along with some coordinating cardstock for the border. To create my layered border, I used the Original Border Maker System and the new Barn & Fence Border Maker Cartridge along with the retired Wheatfield Border Punch. The current Wildflowers Border Punch would make a great substitution.

The barn piece was cut from a On the Farm Variety Mat. The On the Farm Collection was widely popular when it was released, and the paper and variety mats sold out quickly. The On the Farm Stickers feature cute farm animals and are still available. The quick sell-out was unfortunate but sometimes happens with Creative Memories products. So if you love something, it’s always best to purchase it as soon as you’re able.


This page is one side of a double-page layout. For instructions, please see my YouTube video. While you’re viewing my video, please make sure to subscribe to my channel.


Along with the paper items, the On the Farm Collection featured a Tractor Punch which also sold out quickly. CM is ordering more of the Tractor Punch but will only order enough to fulfill PRE-ORDERS. CM is also currently taking pre-orders for the sold-out Trail Sign Punch and Square Tile Punch. Please click here to pre-order any of these punches.


I created a second layout using the same technique, but I started with smaller squares to get a slightly different shape and pattern. For my second layout, I used the Cue the Blue Paper and Embellishments and Navy Cardstock. These items are currently available with Creative Memories.

Please view my video for tips on selecting the size of squares and also for how to easily fold the squares to get uniform pieces.

I appreciate your purchases through my Creative Memories shop, and I offer a generous Customer Rewards Program.


I love the versatility of this technique! If you love versatile layouts that can be used for any types of photos with any materials, you might be interested in the up-coming PJ Party Virtual Crop hosted by Creative Life Scrapbooking. I’m one of seven Creative Memories advisor designers with Creative Life Scrapbooking, and we host quarterly virtual crops. There is a Zoom session on Friday night where 5 of the designers will demonstrate how to create their layout live and two more recorded page classes in the private Facebook group for the event. All of the Zoom sessions will also be recorded and shared in the group for later viewing. If you’re not on Facebook, we email the printable handouts and video links to you.

For more info about the PJ Party and to register, please see our website at www.creativelifescrapbooking.com.

Happy Scrapping!
Karyn

Square Corners using the Border Maker System

Usually, we use the Original Border Maker System from Creative Memories to punch straight borders. But with some of the border maker cartridges, we can also punch square corners. I love how this technique works with the current Home Sweet Home and Rolling Sails Border Maker Cartridges!

I used papers, stickers and embellishments from the Welcome Home Collection and also embellishments from the White Rose Embellishments for my first example. I punched the corners of an 11-1/2″ x 11-1/2″ piece of Hot Fudge Cardstock using the Original Border Maker System with the Home Sweet Home Border Maker Cartridge.

For my second example, I used paper, variety mats, stickers and embellishments from the Serene Waters Collection and the Original Border Maker System with the Rolling Sails Border Maker Cartridge. I punched the corners of a 11-1/2″ x 11-1/2″ piece of Navy Cardstock.

You can also punch all four sides of a square piece of paper using the Rolling Sails and Home Sweet Home Border Maker Cartridge. As these cartridges have a 1″ pattern repeat, make sure to use a piece of paper that’s in a 1″ increment, such as 12″ x 12″, 11″ x 11″, etc. My example below was punched on an 11″ x 11″ piece of cardstock.

Please note that this technique does not work for all of the border maker cartridges. Please watch my YouTube video for a demonstration using other cartridges. I also show an alternative technique that works with some cartridges.

Please also subscribe to my YouTube Channell so I’ll always be easy to find.


All of the tools and materials that I used are currently available to purchase. I appreciate your orders through my Creative Memories website link and offer a generous Customer Rewards Program.


I just added a few virtual and in-person events to my calendar and would love for you to join me!

VIRTUAL EVENTS:


IN-PERSON EVENTS:

I host my in-person events in the Champaign-Urbana area of central Illinois. I would love to meet you in-person!


Happy Scrapping!
Karyn

Double-Edge Punched Frame Scrapbook Layout

Hello! Today I used two of my current favorite Creative Memories tools to create a beautiful layout. This layout features a double-edge punched frame. I punched the outside of my frame with the Damask Flourish Frame Punch and punched the inside of my frame with the Original Border Maker System and Flourish Vine Border Maker Cartridge. I LOVE how these two punched patterns look together!

I punched the outside edge of a piece of 12″ x 12″ designer paper with the Damask Flourish Frame Punch. After punching the frame, I cut out the center of the paper leaving a 2-1/2″ hollow frame. I folded the frame on the diagonal and punched the inside edge of the frame with the Original Border Maker System and Flourish Vine Border Cartridge.

I finished the layout with photo mats cut from Black Shimmer Cardstock and Silver and Gold Foiled Layered Embellishments. The paper is from the Shades of Silver and Gold Paper pack.

All of these materials and tools are current products and can be purchased through my Creative Memories website link.

To see a step-by-step video demonstration of how to create this layout, please visit my YouTube channel. Please also subscribe to my channel after watching.

Happy Scrapping!
Karyn