I was happy when Creative Memories recently introduced a new jumbo cutting pattern and also brought back an older pattern to our Custom Cutting line. The Jumbo Square Frame and the Jumbo Wavy Frame Custom Cutting System Patterns help us create interesting backgrounds for our layouts. The patterns are easy to use with our Cutting Mats and blades, and the pieces can be cut apart to create even more patterns.
I used the Custom Cutting System with the new Jumbo Square Frame Pattern and paper and stickers from the 2023 Croptoberfest Kit to create the layout above. I also used White and Navy Cardstocks and a Navy Dual-Tip Pen to add faux stitching. These items are currently available to purchase through my Creative Memories website link. I appreciate your purchases and offer a generous Customer Rewards Program.
For a step-by-step demonstration of how to create this layout and also other ideas for using the Jumbo Square Frame Pattern, please view my YouTube video.
For my Monthly Technique Layout & Challenge, please use either the Jumbo Square Frame or the Jumbo Wavy Frame to create a layout. Share a photo of your layout in my Facebook group, Karyn’s Croppers, for an entry into my Monthly Door Prize Drawing.
It’s also time to register for Creative Life Scrapbooking‘s fall PJ Party Virtual Crop! During the PJ Party, my scrappy friends and I will share exclusive layouts with printable handouts and live instruction on Zoom! All sessions will be recorded and shared for viewing at your leisure. Each layout features a technique or unique feature and is designed to be versatile to work with any papers. We also make suggestions for how to substitute tools. For more information and to register, please see our website at www.creativelifescrapbooking.com.
It’s one of my favorite times of the year – the start of the fall scrapbooking season! As the kids are back in school and summer vacations are over, we all start to settle back into our old routines and get back to our regular scrapbooking. To celebrate the season, Creative Memories releases a special Croptoberfest Collection each year, and this year’s Croptoberfest materials are really beautiful in shades of blues and browns with cute owl accents.
I used materials from the 2023 Croptoberfest Kit and Mini Embellishments to create the layout above. The adorable Owl Punch was released at the same as the Croptoberfest materials, and it coordinates beautifully with the collection. The Owl Punch has been so popular that it’s already in low quantity, so please purchase it right away if you love it.
I also used the current Field Fence and Leafy Vine Border Punches and the retired Simple Leaf and Pinecone Punches to complete my layout.
Please see my YouTube channel for a demonstration of how to punch the hollow vine circles and also how to use the Owl Punch.
This page is one half of a double-page layout that I created for my Virtual Croptoberfest Workshop on September 23rd. For my workshop, I created 4 double-page layouts and one single-page layout. These are exclusive layouts that I won’t share elsewhere and are for your personal use only.
All of the class sessions will include printable instructional handouts and pre-recorded video instructions. We’ll meet on Zoom on the 23rd to create the layouts together. But if you can’t be on Zoom with me, you will still get access to the instructional handouts and videos.
I love creating scrapbook layouts and sharing them with you here! But I also share layouts on Facebook through a group called Creative Life Scrapbooking. Creative Life Scrapbooking is a group of 7 Creative Memories advisors who are passionate about CM products and share twice a week with ideas for using CM’s tools and materials. We also host quarterly virtual crops called PJ Parties. Our next PJ Party is November 4th. If you can’t participate on Zoom with us, you can still register to receive access to the recorded videos and printable layout instructions. To learn more and to register for the PJ Party, please see our website. We also offer printable Idea Books and access to past PJ Parties on our website.
Spooky!
I used the Original Border Maker System with the Home Sweet Home Border Maker Cartridge to create a spooky layout and a sweet layout. Below is my spooky cute Halloween layout that I created with the Happy Hauntings Collection from CM and shared with Creative Life Scrapbooking today.
I used CM’s Original Border Maker System with the new Bats & Stars, Home Sweet Home and Ghost Chain (retired) Border Maker Cartridges to create a spooky street border for the top of the layout. I added some fun shadows and cobwebs with our White Chalk Pen. Further down the page, I used the new Spider Web Frame Punch to create individual spider webs to adorn the layout. For step-by-step instructions, please see my original Facebook post.
Sweet!
A few weeks ago, I created this super sweet layout using the Original Border Maker System and Home Sweet Home Border Maker Cartridge and also shared it with Creative Life Scrapbooking.
I used the housing unit of the Original Border Maker System as a hand-held punch and punched around the outside edge of circle. The houses came to life with a little work with a Micro-Tip Black Pen. I added a few other pieces from a variety of CM punches and border maker cartridges to create a super sweet street scene.
If you would like to purchase any of the tools or materials that I used for these layouts, I would appreciate your orders through my Creative Memories website. I also offer a generous Customer Rewards Program.
Today I’m sharing two layouts that I created with the Maple Leaf Recipe Template from Creative Memories. The recipe templates are so versatile and can be used to create many different patterns and layouts. For my layouts, I selected not to use the diagonal sections around the outside of the template but rather just the center leaf.
For my first layout, I used the Croptoberfest 2022 Project Recipe Kit and 2022 Croptoberfest Mini Pack Embellishments. If you love these materials, please consider joining me for my Virtual Croptoberfest Workshop on October 15th. We’ll be live on Zoom, but the page classes will be recorded, and I’ll provide printable handouts for the 6 exclusive original layouts that I’ve designed for this event. Please click here to register now.
I used the Maple Leaf Recipe Template to trace my large leaves, and I used the Custom Cutting System with Oval Patterns to create my fun acorns. I used the Pure Brown Dual-Tip Pen to ink the edges of all of the paper pieces of this layout.
For detailed instructions and a step-by-step demonstration on how to create the acorns and this layout, please view my video on YouTube.
Please share your version of this layout to my Facebook group, Karyn’s Croppers for an entry into my October Door Prize.
I created and shared my second layout with Creative Life Scrapbooking on Facebook. For this layout, I used the Maple Leaf Recipe Template and the new Golden Harvest Collection from Creative Memories. This is a gorgeous fall collection with beautiful, foiled embellishments and fun layered border embellishments. For instructions to create this layout, please see my original post to Creative Life Scrapbooking.
All of the tools and materials that I used are available to purchase through my Creative Memories website link. I appreciate all of your orders and offer a generous Customer Rewards Program.
Once I started playing with the beautiful It’sFall Y’all Collection from Creative Memories, I couldn’t stop! I created a versatile double-page layout to share during our Creative Life Scrapbook PJ Party and continued to create a few more. If you love my PJ Party Demo Layout that featured the Wheatfield Border Punch, you’ll likely also love the layout below.
Read below for information about Creative Memories 2021 Black Friday Promo and how to get FREE products with a purchase!
After punching my designer paper with the Wheatfield Border Punch, I cut the border apart to create individual stalks of wheat that I gathered together to create a fall sheave. I completed the wheat bundle with a hand-tied raffia-style bow. Please view my video on You Tube for a demo on how to tie the bow. Please note that the Wheatfield Border Punch was a promotional punch offered by Creative Memories earlier this year and is no longer available.
However, Creative Memories is offering three new exclusive punches as part of our 2021Black Friday Promotion! With a purchase of $160, you can select one of three FREE bundles of product that include an exclusive collection of paper, stickers and embellishments, an album and also a unique exclusive punch. Click here for more information about our Black Friday Promotion.
To Create My Layout:
1. Cut a 1-3/4″ “L”-shape from a piece of the plaid designer paper. 2. Place a sheet of the ledger print paper on top of the “L” piece at an angle and adhere. Use the 12″ Trimmer to cut off the excess paper to create a 12″ x 12″ piece. 3. Punch gold designer paper with the Wheatfield Border Punch. Use the 12″ Trimmer to cut in-between the individual wheat stalks. Use the sight guides on the 12″ Trimmer to help you align the paper.
12″ Trimmer Sight Guides
4. Layer and adhere the individual wheat stalks into a sheave. My stalks are 6-1/2″ – 4-3/4″ in height. 5. Cut a 1/8″ strip of Hot Fudge Cardstock, and tie into a raffia-style bow. Attach the bow with a small Foam Square. See my video for a demo on how to tie the bow. 6. Complete the layout with photo mats, embellishments and stickers.
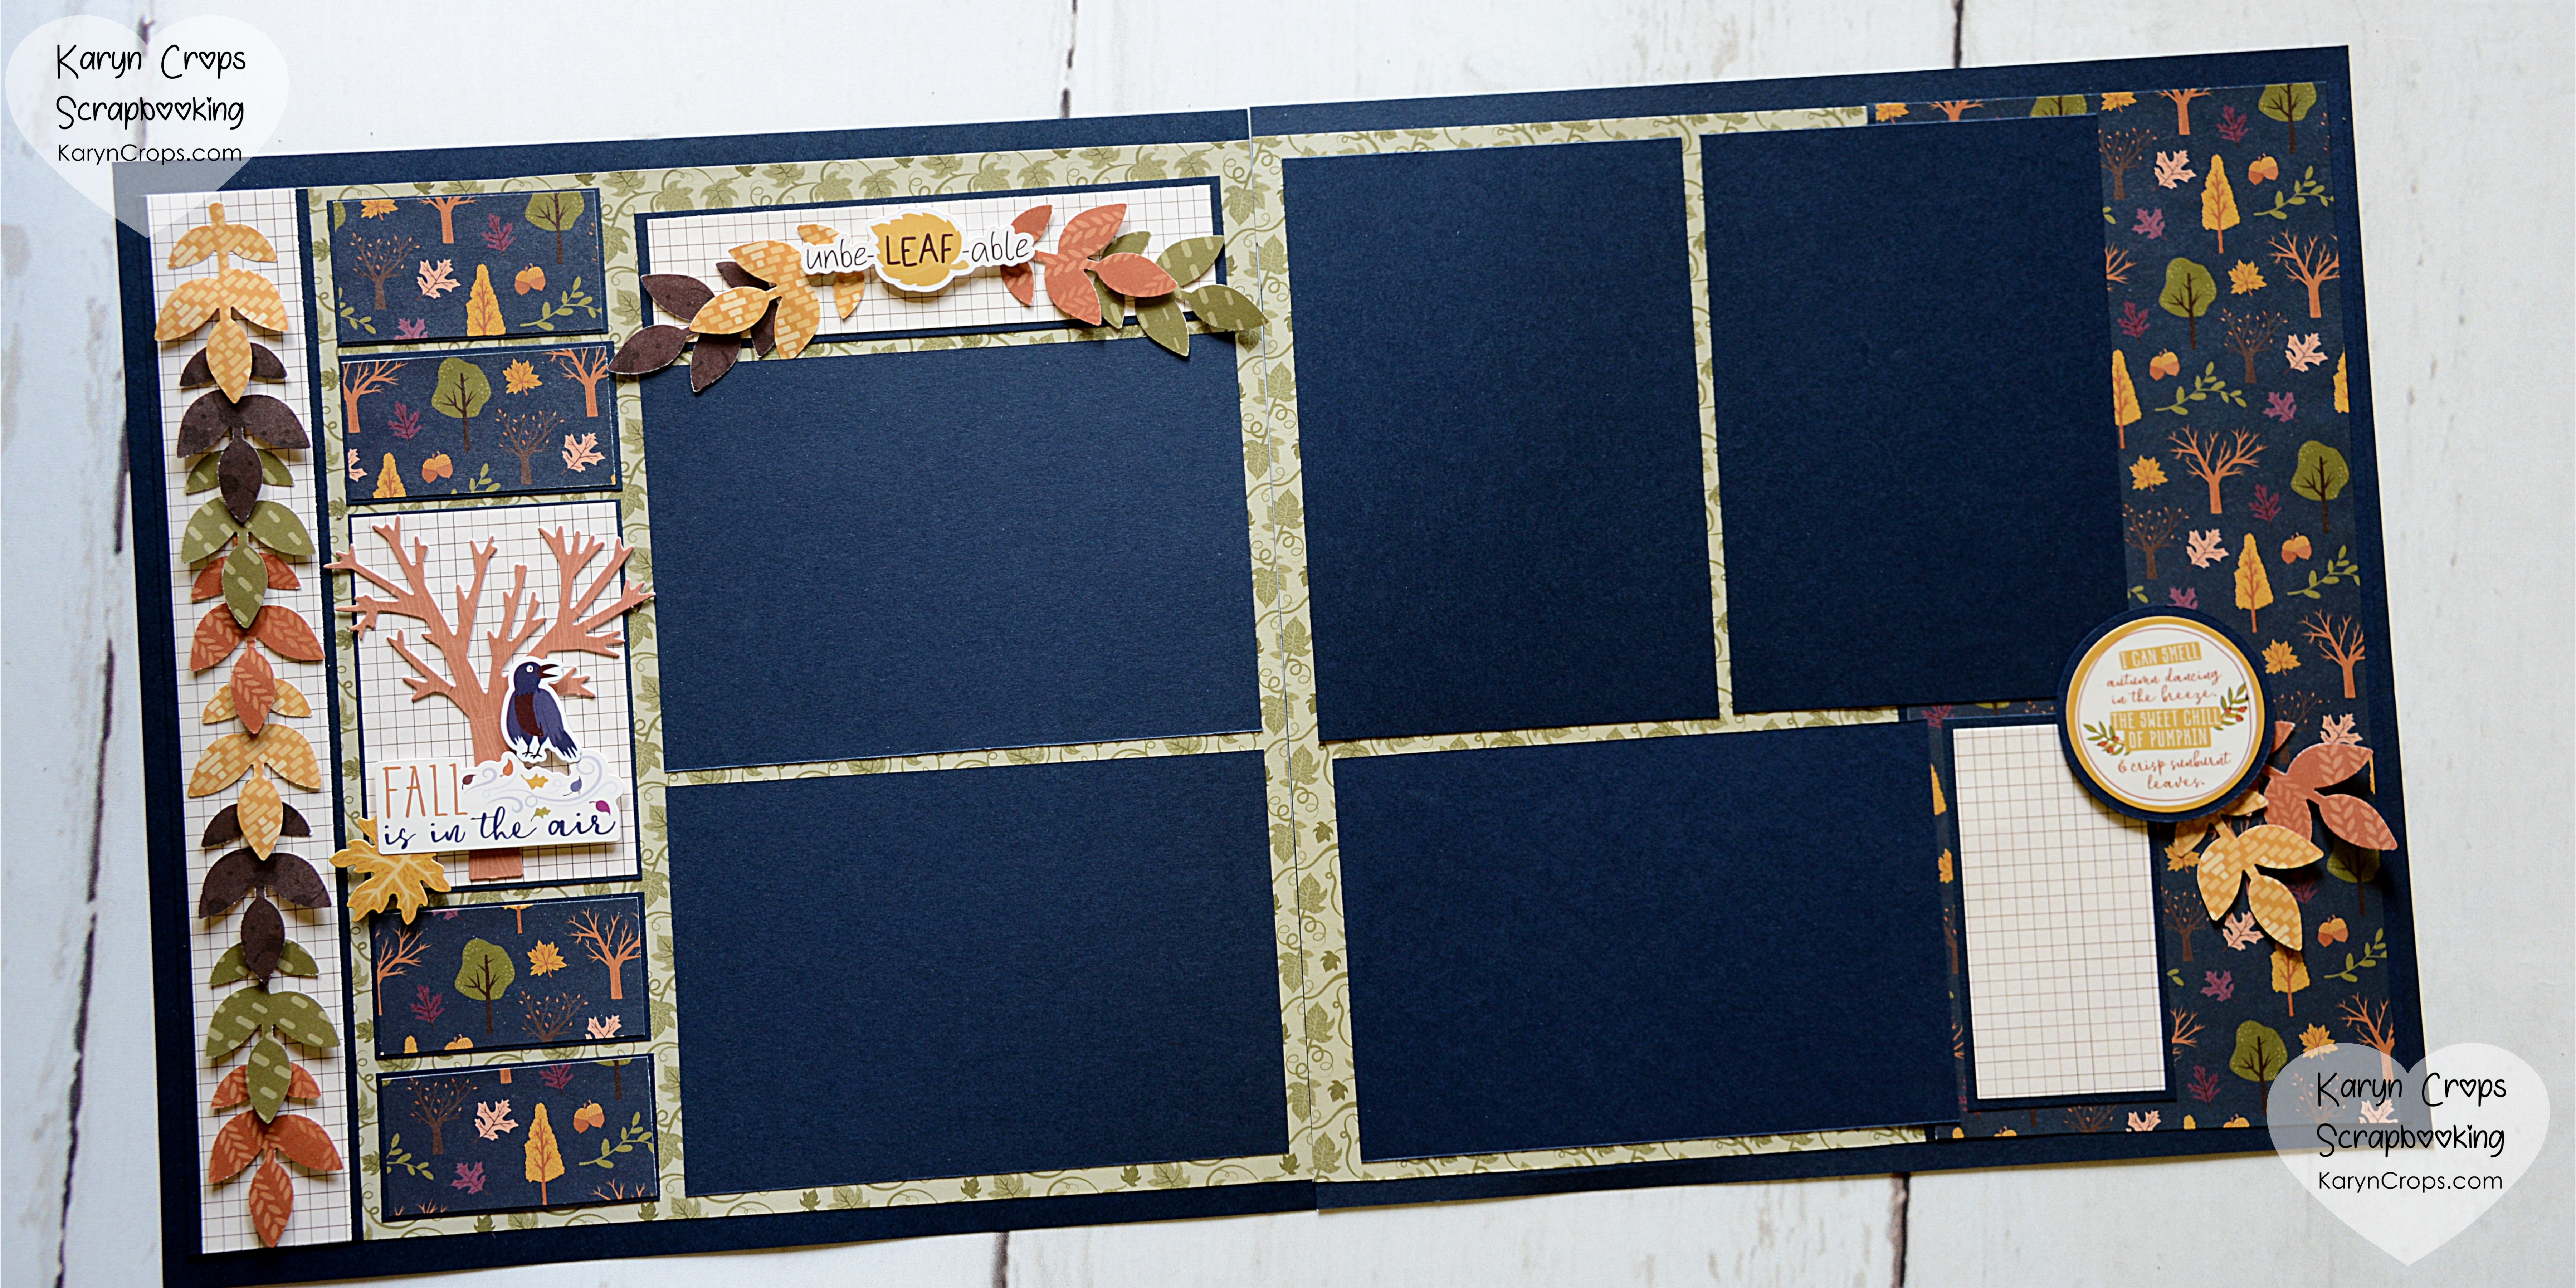
My second layout will be great for some photos that I took while my husband and I took a drive to view the fall color. I really love the color palette of the It’s Fall Y’all Collection! I also love the ledger and grid prints in the It’s Fall Y’all Tone on Tone Paper Pack. They provide a fresh contrast for the designer prints. I used the Five Leaf Punch to create a cascading border of fall colored leaves to accent the layout.
To Create My Layout:
1. Cut 1″ hollow frames from two sheets of Navy Cardstock. 2. Cut two sheets of green leaf paper to 11-3/4″ x 11-1/2″. Attach the leaf paper pieces to the navy frames abutting the right and left edges together to create a double-page. 3. To create the border, cut a 1-3/4″ x 11-1/2″ strip from Navy Cardstock. Cut a 1-1/2″ x 11-1/4″ strip from grid paper. Layer and adhere the pieces. 4. Use the Five Leaf Punch to punch leaves from a variety of designer papers. Working from the bottom of the border, attach the leaves with small Foam Squares under the single leaves. 5. From Navy Cardstock, cut the following pieces: (4) 2-7/8″ x 1-5/8″; (1) 2-7/8″ x 4-1/8″; (1) 6-1/4″ x 1-5/8″; and (1) 2-1/4″ x 4- 1/4″. From grid paper, cut the following pieces: (1) 2-3/4″ x 4″; (1) 6-1/8″ x 1-3/8″; and (1) 2-1/8″ x 4-1/8″. From navy tree paper, cut (4) 2-3/4″ x 1-1/2″. Layer and adhere pieces. 6. Cut 5 photo mats that measure 4-1/4″ x 6-1/4″. 7. Arrange pieces on the layout and adhere. 8. Add stickers, embellishments and additional punched leaves as shown using Foam Squares to adhere some.
FREE WITH PURCHASE!
If you like these layouts and would like to create them, you may purchase the It’s Fall Y’all Collection, 12″ Trimmer, Five Leaf Punch, Foam Squares and Navy Cardstock through my Creative Memories website link. If you make a $160 purchase, you can select one of three FREE Black Friday Bundles! Each bundle has a retail value of $86 and contains an exclusive punch with an exclusive product collection. These punches and materials will not be offered for purchase otherwise. Please see below for the available Black Friday Promo Bundles that you can get for FREE with a $160 order.
Well, hello! It’s time to share some fall themed scrapbook layouts. I made the layouts below using the Fall Y’all Collection from Creative Memories and will be sharing a few more layouts in a few days. I absolutely love the color palette of this collection which contains a mix of purples and navy with the more traditional fall shades of orange, green and gold. I also love the ledger and grid print papers in the It’s Fall Y’all Tone-on-Tone Paper Pack. The embellishments are super cute, and some contain a white matte foil stitched design for a truly charming touch.
I created my first layout with a fun grid technique. I used the discontinued Jumbo Scallop Circle Cutting Pattern, but you can easily substitute our Jumbo Circle Cutting Pattern or any of our other older jumbo patterns. I finished my layout with a laser cut border, two stickers and a variety mat cut into an oval. All of these pieces are also from the It’s Fall Y’all Collection.
Please see my You Tube Channel to view an instructional video of how to create this layout.
I would love to see your version of this layout! Please join my private Facebook group, Karyn’s Croppers, and use this technique to make your own layout and share it into the appropriate Album in Karyn’s Croppers.
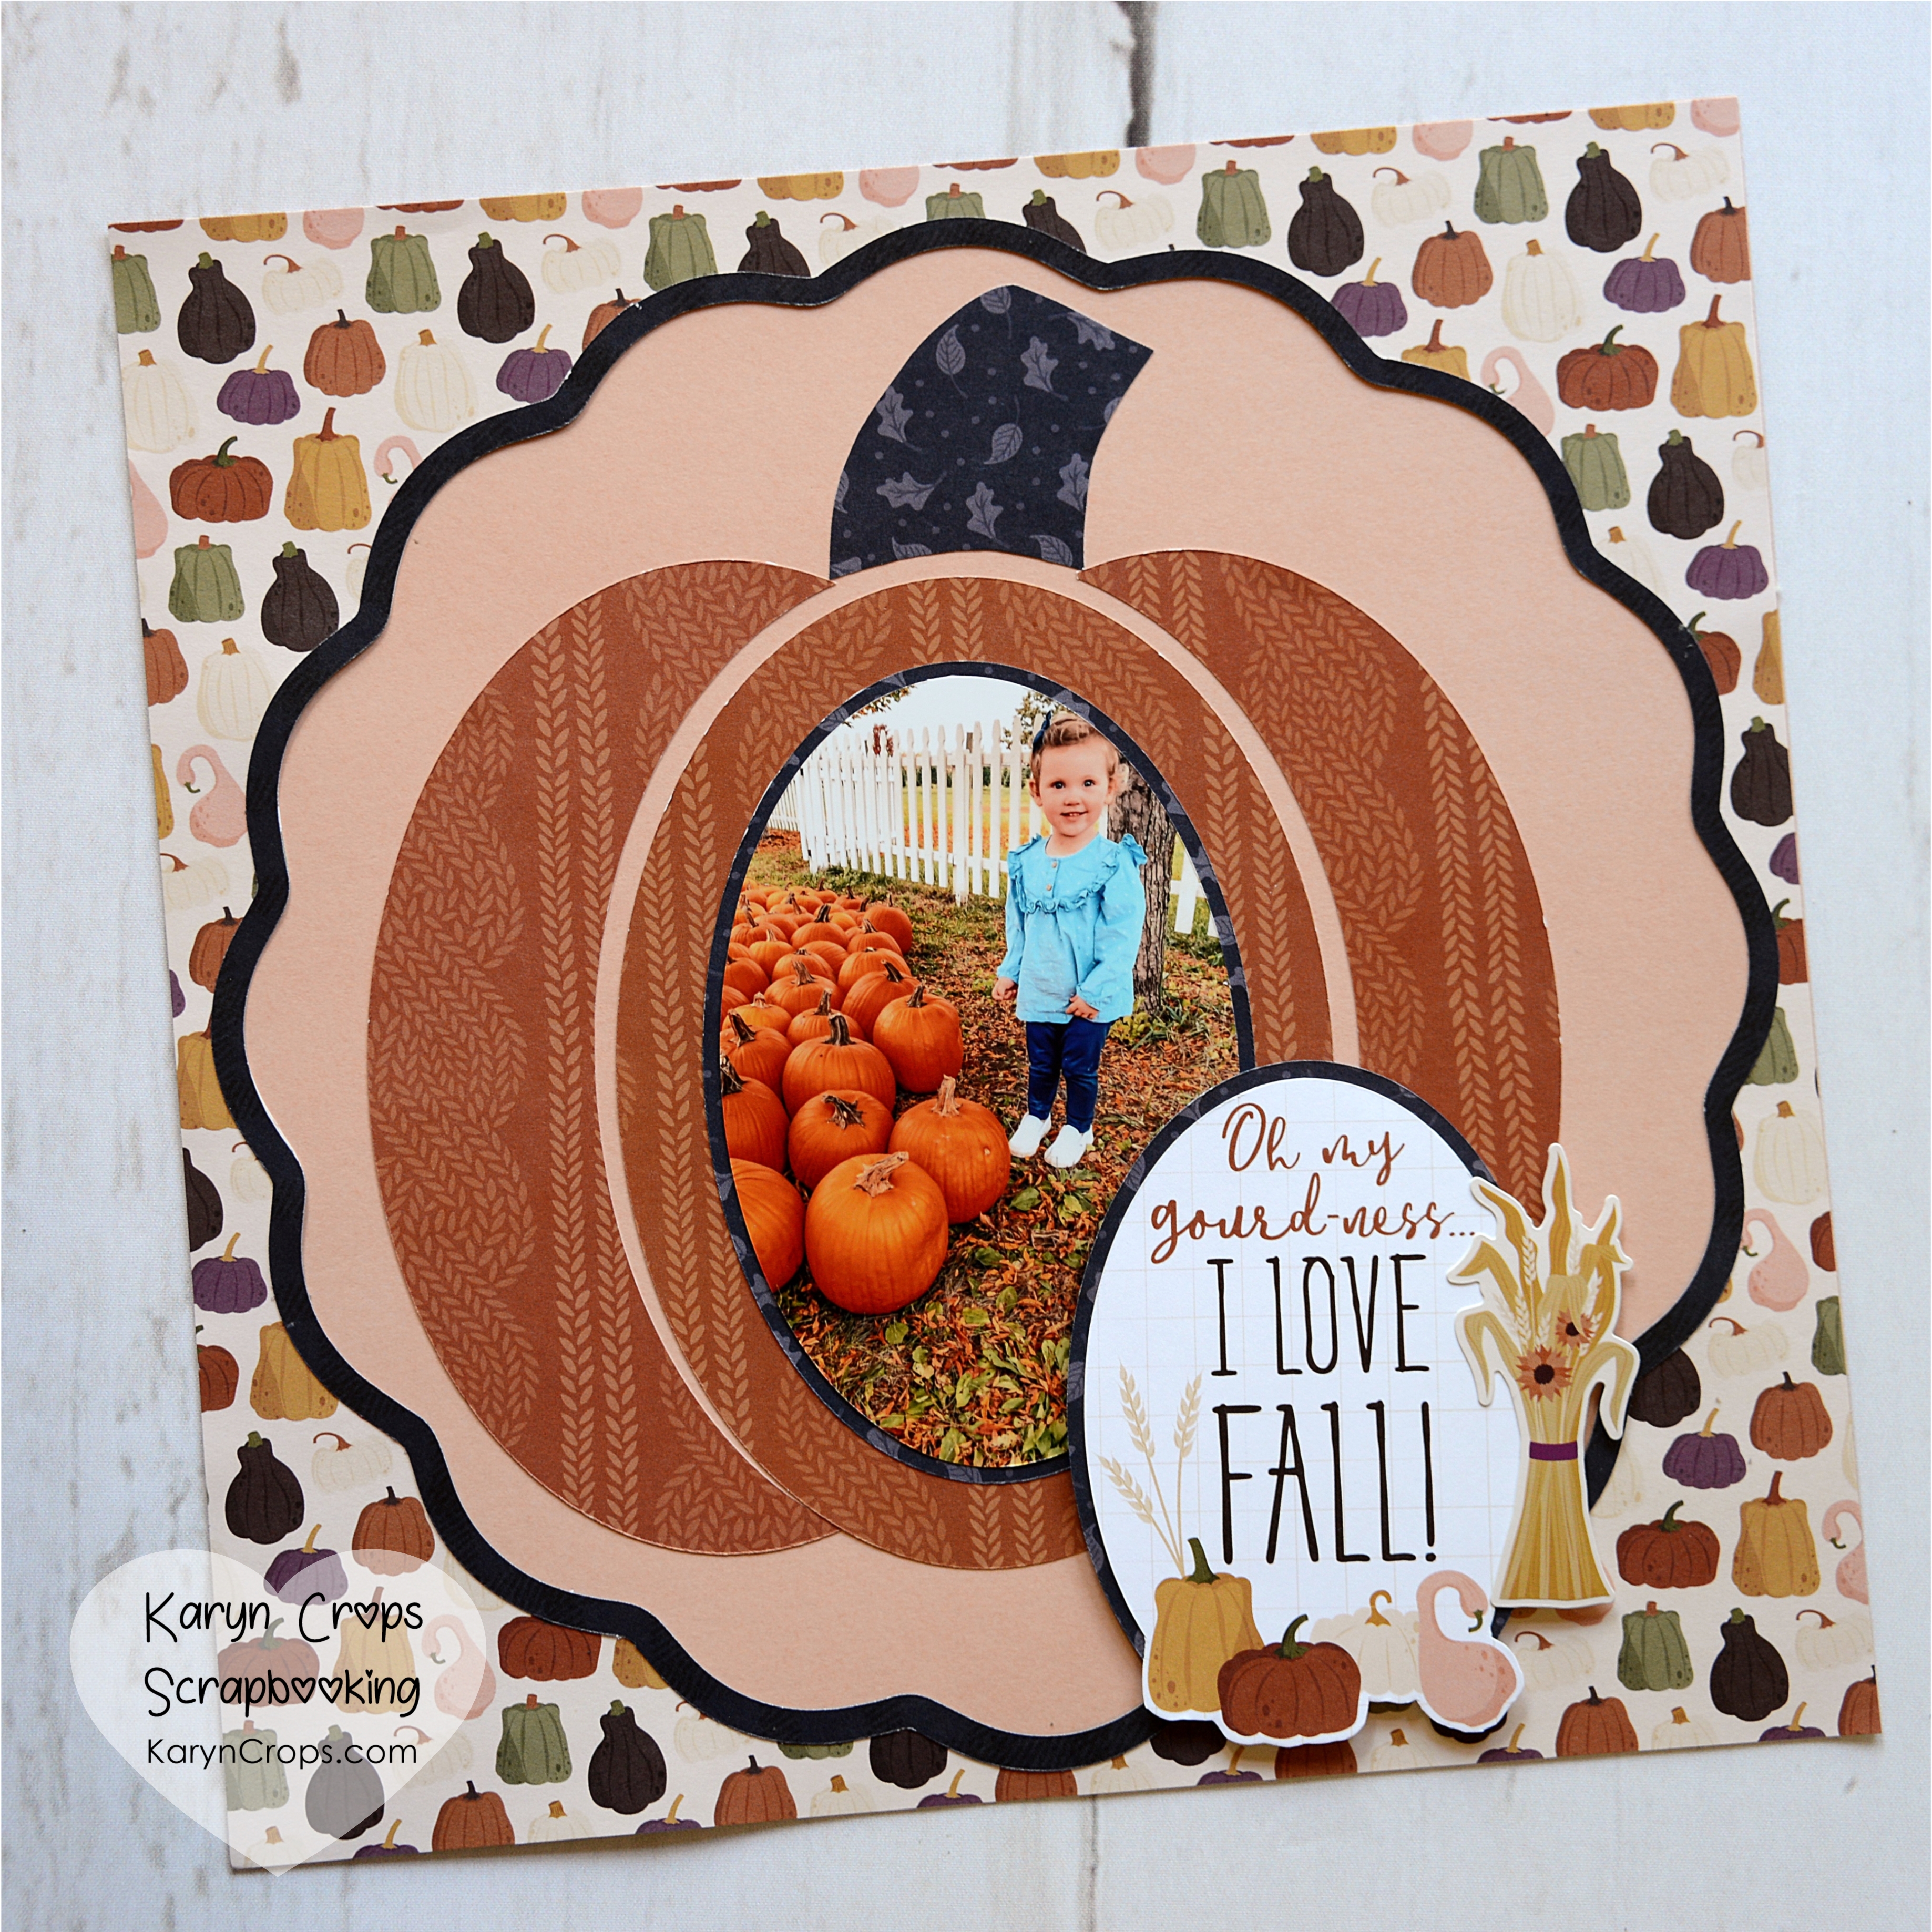
I created my second layout with the relief piece of gourd print paper that was leftover from my first layout. I also used a sheet of Blush Cardstock that was part of the Cardstock Buffet offered by Creative Memories this past summer.
About four times a year, Creative Memories offers either a Cardstock and/or Paper Buffet Promotion where exclusive shades of cardstock or paper are available. These colors are unique and not part of our normal product line, however they are designed to coordinate with up-coming collections. On November 1st, CM launched a new Paper Buffet that features six unique colors of solid-core paper. The solid core papers have a paper weight of 45 pounds and are lighter than our normal cardstock but heavier than our designers papers. If you purchase six packs, you receive a FREE pack of Parakeet Shimmer Cardstock. These unique colors should coordinate with up-coming collections.
1. Adhere the leftover piece of gourd paper from my first layout to a sheet of Blush Cardstock. Alternatively, use the CCS with the Jumbo Scallop Circle Pattern (or substitute another jumbo pattern) and Red Blade on the outside edge to cut a piece from gourd paper. Use the relief piece. 2. Use the CCS with Jumbo Scallop Circle Pattern and Blue and Red Blades on the outside edge to cut a hollow frame from purple paper. Cut with the Blue Blade first and without moving the pattern, cut again with the Red Blade. Adhere to the layout as shown. 3. Use the CCS with the #4 or largest Oval Pattern and Blue Blade on the outside edge to cut one oval from orange print paper and two partial ovals. 4. Adhere the ovals to the center of the layout leaving about 1/4″ in-between the pieces as shown. 5. Freehand draw/cut a stem from purple print paper. Adhere as shown. 6. Use the CCS with the #3 Oval Pattern (third largest) and Green Blade on the outside edge to cut a photo mat from purple paper. Use the Red Blade on the outside edge to cut a photo. Layer, and adhere to the layout. 7. Use the CCS with the #2 Oval Pattern and Red Blade on the outside edge to cut partially around the title in a variety mat. Use the Green Blade on the outside edge to cut a mat from purple paper. Layer, and adhere to the layout with Foam Squares. 8. Add a sticker with Foam Squares.
To purchase the tools and materials that I used, please see my Creative Memories website. Thank you so much for any orders!
If you’re looking for a fun virtual scrapbooking event with some great versatile double-page layout ideas, you might consider joining me and my teammates at Creative Life Scrapbooking for our PJ Party Virtual Crop on Friday, November 5th.
If you can’t join us on Zoom on the 5th, that’s okay. All of the instructional sessions will be recorded and shared in a private Facebook group and can be viewed at your leisure. We will also share printable instructional handouts. The group will be active for the entire month of November as participants make our layouts and share their versions.
Please see our website for more information and to register.
Brrrr! Freezing temperatures! Snow! Ice! It’s perfect scrapbooking weather! If you’re looking for a virtual scrapbooking activity for this weekend, you might consider joining me. I’m hosting a weekend-long event that I’m calling The World Awaits Virtual Scrapbooking Retreat.
As “The World Awaits” for the pandemic to end and get back to “normal”, grab your passport for fun and join my Virtual Scrapbooking Weekend Retreat on February 19-21! We’ll have fun with a travel themed retreat as we daydream and plan the first trips that we’ll take after the pandemic ends. The virtual retreat will feature live page classes and Scrap & Chat sessions on Zoom, challenges, door prizes, a product sale of discontinued and discounted Creative Memories products, and a few fun games. All page classes will be recorded and include instructional handouts. There is a $25 fee to participate, and you can pay with Pay Pal. Please click here to register now.
I will be using the BOHO Escape Collection from Creative Memories for my sample layouts that we’ll create during the Virtual Retreat. We’ll make 7 double-page layouts (14 pages) during the page classes. You may use any materials that you like for your layouts. In addition to the Zoom sessions, there will be a private Facebook group for the event where I’ll share recordings of the page classes and printable instructional handouts. The product sale of discontinued and discounted Creative Memories products will be a Facebook Live post to the Facebook group. And participants will share photos of their completed layouts on the private group.
During the retreat, we’ll make pretty pages like the one above. The layout above is also a good reminder about the Cardstock Buffet that Creative Memories is currently offering. On occasion, Creative Memories offers a Cardstock Buffet with exclusive limited edition cardstock colors that are not part of our product line. The current Cardstock Buffet features exclusive Shimmer Cardstock in 7 different colors. When you purchase 6 packs, you receive one pack for FREE! For more information and to order, please check out my CM website.
For my layout above, I combined the lovely Marigold Cardstock from the last Cardstock Buffet and the Boho Escape Collection. I also used the new Mandala Border Punch to create the pretty frame around the photo and the decorative corner pieces. I’ll be demonstrating this technique during my Virtual Retreat this weekend. Please see my YouTube Channel for a video demonstration of how to make this fancy inside frame.
Hello and welcome to our Creative Life Scrapbooking Fall Blog Hop! We’re so glad that you could join us! If you’re not already a follower, please click here to Like and Follow us on Facebook.
I was inspired by the saying “Home is my Happy Place” to create my layout. This saying really speaks to me as it perfectly sums up my current feelings. My husband and I have been “socially distancing” fairly strictly during the pandemic, and we will be alone for Thanksgiving this week. But I have been so grateful for the comfort that our home has provided to us. Although I am lonely at times and miss family and friends and some of our usual activities, I am truly happy to just be home. I hope that you find the same comfort and joy in your home.
I used the lovely Hello, Autumn collection from Creative Memoires to create my layout. This collection consists of traditional autumn colors, patterns and icons mixed with a few fresh and unexpected twists. The designer paper is double-sided, and the backsides contain neutral prints that are great for those of you in climates that don’t experience a fall season. The Hello, Autumn Embellishments are especially beautiful with gold-foiled leaves.
Please note that our Creative Memories Black Friday Promo ends Friday, November 27th at noon CT or while supplies last. With a $150 purchase, you receive $86.50 in FREE exclusive items! Please see my CM website link for more info!
To create my layout:
From beige plaid paper, cut a 10” x 8” piece and a 10” x 7”.
From green plaid paper, cut a 12” x 4” strip and a 12” x 2-1/2” strip. With a pencil, make a mark at the tops of the pieces at 6”. Using the Trimmer, make diagonal cuts from the marks to the bottom left and bottom right corners to make triangle pieces for the roofs.
From wood-grained paper or Rich Brown Cardstock, use the Trimmer with Scallop Blade to cut two 12” x 3/8” strips.
From wood-grained paper or Rich Brown Cardstock, Cut a 1-3/4” x 2-1/4” piece for the chimney.
From orange patterned paper, cut three photo mats that measure 6” x 4”, two mats that measure 3-1/2” x 3-1/2” and one mat that measures 3” x 3”. If desired add Lined White Paper or White Cardstock to the smallest mat to make a journaling box.
From remaining orange paper, use the Custom Cutting System with the smallest Circle Pattern and Red Blade on the outside edge to cut a partial circle to use as a moon.
Use the Original Border Maker System with the Picket Fence Cartridge to punch a border from wood-grained paper or Rich Brown Cardstock. Cut off of your paper at 2-3/16”. Use Post-It Notes to hold the border piece in the Border Maker and punch the other side of the border. Trim off the bottom points to make a tall fence piece.
From wood-grained paper or Rich Brown Cardstock, use the Branch Border Punch to punch a border.
Assemble layout as shown. Cut apart leaf border sticker, layer with pumpkin stickers and adhere with Foam Squares. Use the Songbirds Border Punch to punch a bird from Black Cardstock.
Use White Serif, White San Serif and White Script ABC/123 Stickers to add title to the roof.
Thank you so much for visiting with us today! During this season of thanks, I would like to express my sincere gratitude to all of you for your continued support of my virtual scrapbooking events and my Creative Memories business and also for your support of Creative Life Scrapbooking. I wish you a Happy Thanksgiving filled with the peace and comforts of home.
Please follow the links below to see more ideas from the rest of the Creative Life Scrapbooking team.
This past weekend would have been the date for my annual October weekend retreat. I’ve been hosting weekend retreats for 18 years now, and we typically fill up my hotel space with 50 croppers three times a year. Due to the pandemic, I replaced this year’s October retreat with a virtual event. Although we missed being together in person, the virtual option is a good substitute that has allowed others from places far and wide to also participate. During our Scrap & Chat sessions on Zoom, we were able to visit and meet 68 croppers from all over the U.S., Canada, Australia and New Zealand!
I taught page classes for 6 original layouts that I created with the Croptoberfest Bundle from Creative Memories, and Kim Scott with Forever, shared instructional videos on how to create my layouts digitally. I also shared an additional Page Class, Demonstration Videos, Sketch Challenges, Scrap & Chat Sessions, Door Prizes, a sale of discounted and discontinued products, and a few games. We had such a fun time, and I hope that you’ll consider joining us for my next virtual event. (Stay tuned.)
Below are photos of the original layouts that I created. I’m offering access to the instructional videos and handouts on how to create these layouts for a $15 fee. With the fee, you’ll receive access to a private Facebook group that contains the page class videos, demonstration videos and an instructional handout for each layout. With these materials, you’ll be able to create the layouts at your leisure. During the recorded page classes, I also share tips and techniques and demonstrate how to use Creative Memories tools.
If you’re a digital scrapbooker or would like to learn how to scrapbook digitally, Kim Scott, will be holding classes that include instructions on how to create my layouts digitally. Please contact me if you are interested in those, and I will connect you with Kim.
I used almost every piece of paper, cardstock, stickers and embellishments that are included in the exclusive Croptoberfest Bundle from Creative Memories to create these layouts. You will only have a few small pieces leftover.
(Unfortunately these materials are now sold out. However, you can use any other materials that you have to create the layouts.)
To purchase access the instructional videos and handouts on how to create these layouts, please pay the $15 fee using my Pay Pal link. This is a great opportunity to participate in a personal scrapbooking class with me!
Would you like to have some scrappy fun THIS weekend (October 23rd – 25th)? Would you like to participate in one of my page classes – or how about 6 of my page classes? This is your opportunity to scrapbook along with me to learn new techniques and to create 6 unique layouts that I created using CM’s Croptoberfest Bundle!
Would you love to participate, but you already have plans for the weekend? That’s okay! I’ll be recording all of my page classes and demonstrations, and they’ll be available for you to watch at your leisure over the next month. I’ll also be sharing instructional handouts for my layouts.
In addition to the demos and page classes, there will be Sketch Challenges and opportunities to Scrap & Chat and visit with croppers from the U.S., Canada, Australia, and New Zealand! There will be an opportunity to purchase discounted and discontinued CM products from me. Plus we’ll have a few fun games and some door prizes!
Are you a digital scrapbooker? There will also be instructional videos on how to create my layouts digitally using Artisan software!
To join the fun, just pay your $25 registration using my Pay Pal link. www.PayPal.me/KarynCrops.
After you’ve paid your $25 fee, you will receive an email invitation to join the private Facebook group that I created for the event. Through the Facebook group, I’ll be sharing the demo and page class videos, handouts, and Facebook Live posts. And participants will be sharing photos of their layouts there. For the Page Classes and Scrap & Chat sessions, we’ll be using Zoom. I’ll keep the private Facebook group up for several weeks, so you’ll have plenty of time to print the handouts and view all of the videos at your leisure. You’ll also have an entire week to complete layouts to be entered into door prize drawings.
I’ll be using CM’s Croptoberfest Bundle for the 6 layouts that I created and also CM’s Hello, Autumn Decorative Bundle for another Page Class and some samples. You may use any materials that you like. But if you would like to use the Croptoberfest Bundle, you can still purchase it through my CM website link. Look under Shop > Virtual Event Kits > Croptoberfest.
I hope that you join us! I would love to meet you!