Gather Together Scrapbook Layouts

KarynCropsWordpressGatherTogetherLayouts - Page 080I’ve been busy making sample pages from the new Gather Together Collection from Creative Memories to use as displays and page classes at my up-coming Croptoberfest events in central Illinois.  We’ll begin by celebrating with an all-day Croptoberfest workshop on Saturday, September 29th and again on October 17th-21st with a three- or four-day weekend retreat!  Please see the events tab for info about my events.

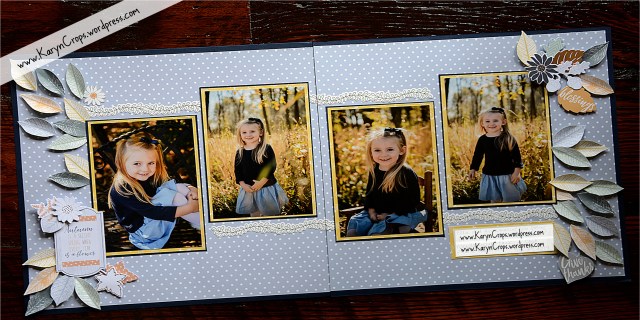
My first layout is a double-page spread that features hand-cut leaves, stickers and beautiful multi-layered embellishments with rose gold foil highlights.  The gray dot papers are cut to 11-1/2″ x 11-1/2″ and mounted on 12″ x 12″ sheets of navy cardstock.  (To conserve cardstock, I cut out the centers of the sheets of navy cardstock.)  My photos are double matted with gold print paper and navy cardstock.  From the sheet of leaf paper, I hand-cut leaves and adhered them with Foam Squares to create an explosion effect.  I also mixed in a few embellishments and a few stickers with the leaves.

KarynCropsWordpressGatherTogether2Page


My second layout features the new On The Vine Border Punch and Original Border Maker System with the new Garland Cartridge from Creative Memories.  It’s an easy page to make that beautifully highlights my photo and also the two border punches.

KarynCropsWordpressGatherTogetherLayouts - Page 073

Start by cutting a sheet of natural cardstock to 11-1/2″ x 11-1/2″ and mounting to a sheet of 12″ x 12″ black cardstock.  The yellow paper is 11-1/2″ x 5-3/4″, and the two white floral pieces are 11-1/2″ x 1/2″.  The top vine is punched from black cardstock with the On The Vine Border Punch, and the bottom border was punched from black cardstock with the Original Border Maker System with Garland Cartridge.  I layered a few stickers under the pumpkin embellishment.  Since all of these photos are from the same photo shoot, I only included journaling on my first layout.  But you could add journaling to the right of the photo on this layout.

KarynCropsWordpressGatherTogetherLayouts - Page 078

I used CM’s Custom Cutting System with the old Jumbo Circle Cutting Pattern to cut my large circles in this next layout.  If you don’t have this cutting pattern, you can trace around a large plate or use a Cricut or other cutting machine to make a large circle.  The black circle is ~11″ in diameter, and the white circle is ~1/4″ larger.  I used the On The Vine Border Punch to punch several vine pieces from white cardstock.  I adhered the vine pieces with Repositionable Refill Tape and bent the border into shape as I adhered it.

KarynCropsWordpressGatherTogetherLayouts - Page 072

My photos are matted with 6-1/4″ x 4-1/4″ white cardstock mats, and the titles are stickers.  I used the Maple Leaf Punch to punch leaves from the new Bronze Shimmer Cardstock and layered the leaves underneath the large embellishment cluster.

KarynCropsWordpressGatherTogetherLayouts - Page 074

I used the new Sweetheart Recipe Template from CM to create my fourth layout.  This 12×12 mylar heart stencil allows you to create a variety of one-of-a-kind layouts with an assortment of traceable heart and chevron shapes – just trace and cut your papers and photos to the pattern of your choosing!

Sweetheart_RecipeTemplate_600x600_IA

KarynCropsWordpressGatherTogetherLayouts - Page 076

I used black cardstock for the background of my layout and choose to use the chevron pattern with some of the darker patterned papers.   I added a 12″ x 3/4″ strip of black cardstock near the bottom as a background to make the border sticker pop.  I used stickers to decorate the page and hand-cut the large leaf in the upper right corner from a Variety Mat.

KarynCropsWordpressGatherTogetherLayouts - Page 077

I shared my last layout during the recent PJ Party Virtual Crop held by Creative Life Scrapbooking on Facebook.  At Creative Life Scrapbooking, we’re a group of bloggers and Creative Memories Advisors who love sharing ideas and inspiration for CM products.  If you’re on Facebook , please “Like” and follow us.

KarynCropsWordpressCLSPJParty9-21-18

I used the Original Border Maker System with Garland Cartridge on the top and bottom of the page and adhered the yellow print paper behind the border parts.  I adhered pieces of the floral print paper behind my tears.  The floral embellishments and title are hand-cut from Variety Mats.  To see and download step-by-step instructions, please see Creative Life Scrapbooking.

KarynCropsWordpressCLSPJParty9-21-18Close-up

I absolutely adore this beautiful collection!  The autumn color palette is one of my very favorites, and each piece of the collection – paper, stickers, embellishments, variety mats, Fast2Fab pages – is a must-have item.  If you need a new album cover, you might want to consider the lovely Gather Together album cover that features brilliant sunset orange bookcloth and is adorned with a stunning leaf design that shines in shades of  gold, copper and deep-orange foil.


You can purchase the materials and tools used for these layouts on my CM website.  I’ll be sharing more layout ideas soon as I make more samples for my weekend retreat in October.

Happy Scrapping!
Signature

Forever Yours & Woodland Whimsy Layouts

Several product collections from Creative Memories are now in limited supply and available while supplies last.  Before they’re gone, I wanted to share a few layouts with you.  My first pages feature the Forever Yours collection.  Forever Yours is elegant with shades of pink, rose, gold, navy and silver and perfect for wedding photos.  On March 5th, our new Black & White wedding collection will be released.  If black and white is not the color palette for your wedding photos, I suggest purchasing the Forever Yours items sooner than later.

KarynCropsWordpressForeverMadeWithLoveWoodlandWhimsy - Page 084

My first layout is quick and easy but yet so beautiful.  I conserved paper by cutting both the silver and navy paper in half at 6″ and adhering to the 12″ x 12″ paper insert from the paper pack.   These inserts serve as a label for the paper packs and show photos of each sheet of paper in the pack.  They are also photo-safe and can be used in our albums.  With this trick, I saved two 12″ x 6″ pieces of designer paper.

I adhered a border sticker to the paper seam and used the Doily Border Punch to punch two borders from white cardstock.  I used the Custom Cutting System with the Circle Cutting Pattern to cut my photo and also to cut a photo mat from the navy paper.  I used Foam Squares under the flower and title stickers and added a few grey pearl gemstones.

KarynCropsWordpressForeverMadeWithLoveWoodlandWhimsy - Page 083

My second page is also a snap to make!  I matted a piece of 6″ x 12″ rose patterned paper with navy cardstock and adhered down the center of a sheet of the multi-print paper.  My photos are 4″ x 6″ and also matted with navy cardstock.  I used the Original Border Maker with the Heart Chain Cartridge to punch three navy borders and adhered them using our Repositionable Tape.  If you don’t yet have CM’s Original Border Maker, the Heart Chain Cartridge is one of three cartridges than come with the border maker when purchased.  Lastly I added a paper flower from the Forever Yours Embellishments and leaf and title stickers adhered with Foam Squares.

KarynCropsWordpressForeverMadeWithLoveWoodlandWhimsy - Page 087

Although the Forever Yours Paper is perfect for wedding photos, the prints are neutral enough to be used with all sorts of photos.  To make the page above, I cut two sheets of pink patterned paper in half on the diagonal and attached to another insert from a paper pack.  Since the paper wouldn’t fit in my trimmer when turned on the diagonal, I folded it in half and cut with my scissors.  I used my flower embellishments and stickers to cover the uneven cut lines.  You will need to cut apart the border sticker to make it fit on the page.  I used a Gold Dual-Tip Pen to edge my Forever Yours flower embellishments,  added small flowers punched from Gold Shimmer Cardstock to some, and added pearl gemstones to the centers.  My photo is 6″ x 4″ and triple matted with two pieces of Gold Shimmer Cardstock and white print paper.  The largest gold mat is 7-3/4″ x 6″, and the white piece is 7-1/2″ x 5-3/4″.  The smallest gold mat is 6-1/8″ x 4-1/8″.  My title piece was cut from a Variety Mat and is matted on a gold shimmer circle and a paper flower embellishment.  I hand-cut the ribbon pieces from Gold Shimmer Cardstock.

KarynCropsWordpressForeverMadeWithLoveWoodlandWhimsy - Page 086

My last page is a reminder that two of my favorite collections from the last year are also being discontinued and are in limited supply.  I’ve made many baby and non-baby pages with both the Woodland Whimsy Baby Girl and Baby Boy Collections.  But I love making pretty pages, and I just had to share this final baby page made with the Woodland Whimsy Baby Girl Papers and Embellishments.

I used the Custom Cutting System with the old Jumbo Circle Cutting Pattern to cut a hollow circle from brown cardstock.  Using the Original Border Maker System with the Sprout Cartridge, I cut two borders from brown cardstock.  Using the Cherry Blossom Punch and other flower punches, I created layered flowers from the pink designer paper.  My leaves were punched with the Maple Leaf Punch and old Leaf Trio Punch.  I used the Outdoor Adventure Quartet Punch to punch a single bird from black cardstock.  My photo is 7″ x 5″ and matted with brown cardstock.  To assemble, I recommend laying out all of the pieces first before you start to adhere.  You’ll have to cut the sprout borders in order to wind them around the circle.  I adhered all of the flowers, the bird and the title embellishments with Foam Squares.  You’ll notice that I also edged my flower pieces with a brown pen and used the brown pen to draw veins on the leaves and bark lines on the sprout borders and the large circle piece.  I also added a pen detail around the entire edge of the page.


KarynCropsWordpressWoodLandWhimsyBabyGirl

You may purchase the pieces of the Forever Yours and Woodland Whimsy Baby Girl Collections under the Going Gone section of my Creative Memories website.

Happy Scrapping!

Signature

Fall Blog Hop

Hello and welcome!  My friends and I at Creative Life Scrapbooking are so glad that you’re joining us for our Fall Blog Hop!  After you finish looking at my projects, click on the link at the bottom of my post to hop over to Stefani’s blog to see more ideas.

Today I’m sharing scrapbook pages using all of Creative Memories fall themed products!  I made my first page using the Exclusive Limited Edition Croptoberfest 2017 Project Recipe Kit.  This kit contains decorative paper, stickers, cardstock and instructions to make two double-page layouts and is only available to purchase directly from a CM advisor.  Instead of using the kit instructions, I used the materials to make my own fall themed page.

KarynCropsWordpressFallBlogHop - Page 095

Use a 12″ x 12″ white scrapbook page or piece of white cardstock as your base.  From the decorative paper and cardstock in the kit, cut a variety of strips of varying widths and 6″ in height.  Using CM’s Original Border Maker System with the Zig Zag Cartridge, punch three borders from the orange print paper and cut each in half.  From green floral print paper, cut a 12″ x 1/2″ strip.  Using the Border Maker with the Scallop Dot Cartridge, punch a border from the teal cardstock and cut off of your cardstock at 2″.  Assemble page as shown adding stickers and faux pen stitching as shown.  I used Foam Square Adhesives to adhere some of my stickers.

KarynCropsWordpressFallBlogHop - Page 092

I used CM’s Limited Edition Toil & Trouble Paper Pack and the Exclusive 2017 Croptoberfest Cardstock for my second page.  This pack of cardstock coordinates with all of our fall collections and can only be purchased directly from a CM advisor.  To make my page, use the cream cardstock in the pack as the base of the page.  From the floral designer paper, cut a 3″ x 12″ strip.  From the teal dot paper, cut a 2″ x 12″ strip.  From wood print designer paper, cut strips that measure 1″ in height and notch the ends with scissors.  Thinly mat the wood strips with the dark orange cardstock.  Cut two 6-1/4″ x 4-1/4″ photo mats from the dark orange cardstock.  Using the Maple Leaf Punch, punch 6 dark orange cardstock and 6 orange print leaves.  Assemble page as shown adding title with CM’s new Burnt Orange ABC Letter Stickers.

KarynCropsWordpressFallBlogHop - Page 094

The Countryside Comfort Collection was perfect for my last three fall pages.  To make the page above, cut bird print paper to 11-1/2″ x 11-1/2″ and adhere to a 12″ x 12″ piece of brown cardstock (To conserve cardstock, cut out a hollow square frame from the center of the cardstock first.)  From brown cardstock, cut a photo frame to 10-7/8″ x 4-1/4″.  Crop photos to 3-1/2″ x 4″ and adhere to mat.  Use CM’s new Victorian Fence Punch to punch a fence from brown cardstock and adhere underneath the top of the photo mat.  Using the Border Maker with new Pumpkins Cartridge, punch two borders from brown cardstock and one border from orange print designer paper.  Adhere the two brown pumpkins border together, and then add the orange pumpkin border onto the top adhering with Foam Squares.  Adhere border to bottom of photo mat.  From brown cardstock, use Maple Leaf Punch to punch 20 leaves.  Use Maple Leaf Punch to punch 10 leaves from gold designer paper and 10 leaves from orange designer paper.  Mat the leaves and assemble as shown.  Adhere the top 6 leaves with Foam Squares.  Add titles using the new Everyday Sentiments Embellishments.

KarynCropsWordpressFallBlogHop - Page 093

To make my second Countryside Comfort page (above), cut wood print paper to 11″ x 11″ and adhere to top of the plaid paper.  (To conserve paper, cut out a hollow square frame from the center of the plaid paper first.)  Using the Border Maker with Scallop Dot Cartridge, punch a border from orange paper, cut off of your paper at 2″, and trim to 11″ wide.  Using Victorian Fence Punch, punch a fence from brown cardstock, cut to 11″ wide, and trim as shown.  From floral print paper, cut a 11″ x 3/8″ strip and thread through the fence piece as shown.  (See photo below.)  Using the Custom Cutting System with the largest Circle Pattern, cut a circle from floral paper using the green blade on the outside edge.  Cut a circle from brown cardstock using the blue blade on the outside edge.  Crop photos to 3-1/2″ x 4″ and mat with orange paper cut to 3-3/4″ x 4-1/4″.  Assemble page as shown adding banners, a journaling box and Countryside Comfort stickers as shown.  I used Foam Squares for my banners and stickers.

iphonedemo 002

For my last page, I used paper, stickers, and variety mats from the Countryside Comfort Collection.  I also used the November Sketch from Creative Scrapbooker Magazine as my inspiration.

KarynCropsWordpressFallBlogHop-GatherPage


To make the page above, cut the white/grey print paper to 4-3/4″ x 10″ and mat with a 5″ x 10-1/4″ piece of navy cardstock.  Mat the two variety mats with navy cardstock cut to 1/4″ larger, and add photos that are also matted with navy cardstock.  Using the Victorian Fence Punch, punch fence pieces from the white/grey print paper and navy cardstock.  Using the Custom Cutting System with the heart from the Gemstone Patterns, cut a heart from orange print paper using the red blade on the outside edge and cut a second heart from navy cardstock using the green blade on the outside edge.  Use CM’s old Daisy Punch and Maple Leaf Punch to punch flowers and leaves from wood print and orange print papers and navy cardstock.  Assemble page as shown adding stickers and using Foam Squares to adhere the flowers and the bird stickers to the fence.

KarynCropsWordpressFallBlogHop-Meme

Make sure to “Like” and “Follow” me and the others at Creative Life Scrapbooking on our Facebook Page where we share weekly features and host special events.  Here are some borders that I recently shared using CM’s fall products.

KarynCropsWordpress.Com-CountrySideComfortBorders - Page 095 KarynCropsCLSPumpkinLeafBorder - Page 094

Please let me know if you have any questions about my projects or any of the materials that I used.  You may purchase the tools and materials on my CM website.  If you would like to purchase the Exclusive 2017 Croptoberfest Project Recipe Kit or Croptoberfest Cardstock, please contact me.

Thank you so much for visiting with me, and hop on over to Stefani’s blog to see more great ideas!

Sarah Fitzgerald at Click Write Share
Noreen Smith at Organized and Creative Mom
Karyn McDermaid-Rolfe at Karyn Crops (YOU ARE HERE)
Stefani Jones at Crop With Stef
Fran Smitherman at Celebrating Your Beautiful Life

One Layout Done Two Ways

watermarks-page-021

It’s a cold icy day in central Illinois.  In other words, it’s a great scrapbooking day!  As many of you do, I have several favorite layouts that I tend to repeat.  Falling back on and using a favored layout is a great way to kick-start your scrapbooking.  When you pull out your photos and all of your supplies, sometimes it’s a little over-whelming and difficult to get the “creative juices” flowing.  So having a few basic layouts in your repertoire can be a great scrapbooking strategy.

This is a fairly easy layout to duplicate and can be adapted in many ways.  I usually prefer matching backgrounds for my double-page spreads, so this is a good technique to use if you don’t have two sheets of matching paper.  Just cut two coordinating sheets in half and then adhere them together with a border across the middle.  To add extra depth and definition, you can use another sheet behind.  Just trim off one inch from your other pieces.  To conserve paper, cut out the center of the background sheet leaving a one inch frame all around.  When you add your pieces on top, center them to leave a half inch frame on all four sides.

2-page-watermarks-page-012

For my first layout above, I used our Creative Memories Denim Blues Paper, Embellishments and ABC/123 Stickers.  The heart frame was punched with our Original Border Maker System and Heart Chain Cartridge.  (The Heart Chain Cartridge is currently one of three cartridges that come with the Original Border Maker System.  It can also be purchased separately.)  Use your scissors to make small snips in-between each heart, but leave the chain intact not cutting all the way through. You can then bend your heart chain into shape.  You will definitely need our Repositional Tape Refill for this.  If may take a few tries and some tinkering to get your heart shape to your liking.  I used three heart chain borders to make my heart.

2-page-watermarks-page-013

For my second layout, I used our beautiful Be Bold & Flourish Paper Pack and Slide-In Cards.  These are currently available while supplies last in the Going Gone section of our website.  You’ll want to grab an extra pack of this gorgeous paper before it’s sold out.  I used our Leaf Trio Punch to punch ferns from our Gold Shimmer Cardstock to make my large wreath.  To make the wreath extra lush, I built up my wreath with several layers.  Since this collection did not come with embellishments, I created my own flowers with old CM flower punches and our Maple Leaf Punch.  For added dimension, I used Foam Squares to adhere my flowers.

I can envision lots of versions of this layout.  And many of our border maker cartridges and punches (Garden Vine Punch) could be used to make the frame on the second page.  Frames could also be cut using our old Jumbo Cutting Patterns.  I would love to see your interpretations of this layout!  Feel free to share your versions on my business Facebook Page.

The products and tools featured can be purchased from my Creative Memories website.

watermarks-page-020

DSC_9731


Christmas Past Crop Club

watermarks-page-003

I hold a monthly Crop Club where we gather to make 3 double-page layouts using one page sketch, one pack of paper and one pack of embellishments.  Attendees only bring a few basic tools, and I provide CM’s newest tools for everyone to try.

In November, we made pages using our new Creative Memories Christmas Past Paper and Embellishments and the page sketch below by my friend, Noreen Smith.  You can download this sketch with instructions and also view a video demonstration on Noreen’s Blog, Organized & Creative Mom.

cropclub7christmaspastsketch

This sketch made a super cute Halloween page and also beautiful Christmas pages.  I incorporated our Garden Vine Punch and our new Snowflake Chain Cartridge for our Border Maker System on the layout below.  I also added a photo mat from Beige Cardstock to the first page in order to have some of the beige color on both pages.  It’s hard to see in the photo, but I did pen stitching around the reindeer embellishment to make it pop.  I skipped journaling on these pages, but will add journaling to the next layouts.

2-page-watermarks-page-003

On the pages below, I added photo mats and narrow strips from our Gold Shimmer Cardstock.  I made the photo mat on the second page into a ribbon.

2-page-watermarks-page-004

On the layout below, I added some leave embellishments punched from our Silver Shimmer Cardstock with our Maple Leaf and Leaf Trio Punches.  These silver shimmer pieces really help to brighten up these pages.

2-page-watermarks-page-002

Please contact me or visit my CM website to purchase any of these products.  We’re taking a break from Crop Club in December, but will start back up in January.  Please contact me if you’re in the Champaign-Urbana area and would like to join us.

Cheers!
Karyn


Christmas Blog Hop

watermarks-page-002

Welcome to our Christmas Blog Hop!  Six Creative Memories Advisors from North America have joined together to provide you with ideas and inspiration for your Christmas paper crafting.  At the bottom of my blog post, you’ll find links to take you to the next stops on our Blog Hop.  Be sure to visit all of the sites and leave comments for us!

For my project, I created a 2-page scrapbook layout using some items from the new Creative Memories Christmas Past Collection.  I also used several of our newest tools to create the lush layered border and embellishments.  Our new Gold Shimmer Cardstock provides an extra touch of elegance and decadence for these pages.


my-joy-2-page

I created the gorgeous trailing vine border across the tops of the pages with our Garden Vine Punch.  This punch immediately sold out when it was first introduced in October.  It’s back in stock but only available while supplies last.  So I suggest purchasing this punch sooner than later.


watermarks-page-002

I also incorporated a new take on the faux Maple Leaf Punch poinsettias that I first created for the Creative Memories Blog post, Christmas in July.  These new poinsettias are white and include layered greenery punched from our Leaf Trio Punch.  (Below is a peak at my first poinsettia border.  Please visit the CM Blog to see the full blog post with instructions.)


DSC_8222

watermarks-page-003

To make my layout, you’ll need:

Christmas Past Paper Pack
Christmas Past Variety Mat Pack
Christmas Past Embellishment Pack
Gold Shimmer Cardstock
Beige Cardstock
White Cardstock
Ruby ABC/123 Stickers
Gold Pen
Brown Pen
Tape Runner
All-Purpose Scissors
12-Inch Straight Trimmer
Garden Vine Punch
Maple Leaf Punch
Leaf Trio Punch
To purchase any of these items, please visit my CM website.

  1.  From poinsettia designer print paper, cut two 12″ x 2″ strips and adhere to tops of 2 sheets of Beige Cardstock.
  2. From Gold Shimmer Cardstock, use the Garden Vine Punch to punch two borders.  Adhere these borders on top of strips of Gold Shimmer Cardstock and use scissors to cut out.  Adhere these pieces to bottoms of the poinsettia paper strips.
  3. From White Cardstock, use Maple Leaf Punch to punch 12 leaves.  Outline the edges of the leaves and draw veins with a Gold Pen.
  4. From Gold Shimmer Cardstock, use Maple Leaf Punch to punch 6 leaves.  Use gold pen to draw veins.
  5. From Gold Shimmer Cardstock, use Leaf Trio Punch to punch a variety of leaves.
  6. From Gold Shimmer Cardstock, cut mats for your photos and also a mat for your journaling box.
  7. Assemble and adhere your photos and the poinsettias and leaves as shown.
  8. Add a title using our Ruby ABC/123 Stickers and rhinestone embellishments from the Christmas Past Embellishments.
  9. Add journaling with a Brown Pen.

my-joy-2-page

Please visit the next stop on our Christmas Blog Hop and enjoy all of the ideas being shared.  I hope that you leave the hop inspired to make a few of our projects.  Thanks much for visiting with us and best wishes for a very Merry Christmas!

Karyn

Karyn Crops (You Are Here)

Lisa’s Workshop

D. Brinsley’s Memory Keeping Blog

Crop With Steph

Celebrating Your Beautiful Life

Organized& Creative Mom


Thankful…

thankfulwatermark

This beautiful page is a visual reminder of two little people who we are most grateful for this Thanksgiving season.  The page is on my old Creative Memories Everyday Display in my kitchen, and I can’t help but smile whenever I look at it.

watermarks-page-003

I used our Bats in the Belfry paper that has cute Halloween prints on one side and neutral prints on the backsides.  The leaves were punched with our Maple Leaf and Leaf Trio Punches, and the brown vine was punched with our Garden Vine Punch. I sketched and free-hand cut the tree trunk myself, and I used our Gold ABC/123 Stickers for the title.  Please visit my website to purchase any of these products.

watermarks-page-002

Happy Thanksgiving!
Karyn

Croptoberfest!


crop

Our Exclusive Croptoberfest Paper and Stickers evoke a warm fuzzy fall feeling with beautiful muted and textured papers!  Our Croptoberfest items are only available for a limited time and are only available directly from a CM advisor.  Please contact me if you would like to purchase them.

To make my pages below, you’ll need the Croptoberfest paper and stickers, our Maple Leaf Punch and our Border Maker System with Picket Fence Cartridge and Circle Weave Cartridge.  I also used our Mint ABC/123 Stickers for my title on this first page.

2-page-watermarks-page-005


Instructions to make this layout:

  1. From diamond patterned paper (see photo), cut two 1-3/8” x 12” strips following the pattern of the paper as shown.
  2. Noting direction of the pattern, cut dark wood grained paper in half. Cut mottled green paper in half.  Lay a piece of the wood grained paper abutted on top of a piece of the green using  the grid on your custom cutting system mat as a guide to line up the pieces to a perfect 12″ x 12″ shape.  Adhere a border piece horizontally to the center of the page to hold both sides together.  Repeat with second page.
  3. Using the red blade on the outside edge of the 4” x 6” oval pattern, cut an oval from the orange word patterned paper. Using your scissors cut a little dip in the top center of the piece to make it look like the top of a pumpkin.  Using the green blade on the outside edge of the 4” x 6” oval pattern, cut an oval from the brown cardstock.  Adhere the patterned piece on top of the brown piece.  Use scissors to trim the brown cardstock to follow the dip that you had previously cut in the patterned paper.
  4. Using the red blade on the outside edge of the 3.5” x 5” oval pattern, cut an oval from the orange word patterned paper. Using the green blade on the outside edge of the 3.5” x 5” oval pattern, cut an oval from the brown cardstock.  Cut both pieces in half vertically and adhere patterned pieces to the brown pieces.  Using your scissors, freehand cut a stem piece from the green word patterned paper.  Adhere this piece to the brown cardstock and cut brown cardstock with scissors to create a mat for the green stem piece.
  5. Assemble and adhere your pumpkin pieces on the first page as shown.
  6. From red word patterned paper, cut two 4.25” x 6.25” photo mats and mount photos. From beige wood grained paper, cut four 3.75” x 3.75” photo mats.  Crop four photos to 3.5” x 3.5” and mount on mats.
  7. From the backside of the paper with the journaling boxes, cut a 4.75” x 3” journal box. From dark brown wood patterned paper, cut a 5” x 3.25” mat for the journaling box.
  8. Adhere photos and journaling box to pages.
  9. Using the border maker with picket fence cartridge, punch two borders from the dark brown wood patterned paper. Use foam squares to adhere to bottoms of pages.
  10. Using maple leaf punch, punch leaves from the red word patterned paper, green word patterned paper and the orange word patterned paper.
  11. Adhere “Love This” sticker to green word pattern and trim to a ribbon shape.
  12. Add leaves and stickers to page as shown using foam squares on the ribbon piece and green leaf.
  13. Add title and journal.

Karyn Croptoberfest 2016-1


Karyn Croptoberfest 2016-1

2-page-watermarks-page-004


Instructions to make this layout:

  1. Cut two 1.5” x 12” strips from the dark brown mottled paper.  Cut two 1” strips from the green word patterned paper.  Using the border maker, punch two circle weave borders from the dark brown wood patterned paper.  Layer and assemble pieces as shown.
  2. Noting direction of the pattern, cut the beige wood grained paper in half. Noting the direction of the pattern, cut the diamond patterned paper in half.  Lay one of each piece side-by-side on top of your custom cutting system mat using the grid so that the pieces line up to a perfect 12×12 shape.  Adhere a border piece vertically to the center of the page to hold both sides together.  Repeat with second page.
  3. From the backside of the paper with the journaling boxes, cut a 4” x 3.25” journal box.
  4. From the brown mottled paper, cut two 4.25” x 6.25” photo mats and a 4.25” x 3.5” mat for your journaling box.
  5. From the green word patterned paper, cut four 4.25” x 4.25” photo mats. Crop four photos to 4” x 4” and adhere to mats.  Adhere all of your photos and journaling box to your pages.
  6. From green word patterned paper, red word patterned paper, and orange word patterned paper, punch leaves using maple leaf punch.
  7. Layer stickers and leaves using foam squares on some pieces as shown.


watermarks-page-001

For instructions to make this page, please search Google for “sunburst scrapbook page”, and you will find several tutorials and YouTube videos.