Hello! Today I’m sharing some layouts that I created earlier this past spring. The Daydreamer collection from Creative Memories is one of my favorite collections from this year, and I wanted to show it to you before it sells out. Photographs of this collection do NOT do it justice. The subtle light-colored patterns and the sparkle on the embellishments are hard to capture. Trust me – it is even more beautiful in person! I’ve already used up three sets of it!

My first layout features pretty frames punched with the Petal Frame Punch from Creative Memories and some beautiful embellishment/sticker clusters. I can’t wait to find the perfect photographs for it!
To make my layout:
1. Cut burgundy paper to 10″ x 10″.
2. Cut white/beige paper to 10″ x 10″, and punch around the edges with the Petal Frame Punch.
3. Cut yellow photo mats to 3-1/2″ x 3-1/2″.
4. Cut journaling box from White Cardstock using the Custom Cutting System with the medium sized Circle Pattern and the Green Blade on the inside edge.
4. Punch a 4″ x 4″ burgundy square with the Petal Frame Punch.
5. Assemble page as shown.
6. Layer Daydreamer Stickers and Embellishments as shown and adhere with Foam Squares.


My second layout features another pretty framed piece that I created with the Lace Trim Border Punch and more of the lovely Daydreamer Embellishments and Stickers. The Lace Trimer Border Punch is another favorite of mine. It’s great for layering and for making pretty pages!

To make my layout:
1. Use the Lace Trim Border Punch to punch 4 borders from White Cardstock. Cut the pieces off of the cardstock at about 1-1/4″ and trim to 9-1/5″ in length.
2. To make mitered corners on your border pieces, place the borders onto the 45 degree line on your 12″ Trimmer. Place the upper edge of the border onto the dashed cutting line and cut. Flip the border over to the backside, turn it around and place the other end onto the 45 degree line and upper edge on the dashed cutting line, and cut.

IMG_3075
3. Cut green paper to 7-3/8″ x 7-3/8″.
4. Cut photo mats to 4″ x 6″ and 2-3/4″ x 2-3/4″.
5. Cut journaling circle or photo frame using the Custom Cutting System with the largest Circle Pattern and the Red and Green Blades on the inside edge.
6. Assemble layout as shown. Add stickers and embellishments adhering some with Foam Squares.


For my next layout, I used a quick and easy technique that I borrowed from Tessa Chapple. Tessa calls this technique Shadow Borders. You can use this technique with any of our border punches or even our border maker cartridges. This is a great technique for the Roller Coaster Border Punch!

To make my layout:
1. Punch both ends of the pink paper with the now discontinued Tulips Border Punch. Cut the bottom end off of the paper, flip it over to its backside and adhere onto the pink paper.
2. Use Foam Squares to adhere a 4-1/4″ x 6-1/4″ Daydreamer Variety Mat to the center of the page.
3. Cut two additional Daydreamer Variety Mats to 3-1/4″ x 5-1/4″ and adhere at angles.
4. Add Daydreamer border stickers to the top and bottom of the layout. Add additional stickers and embellishments adhering some with Foam Squares.


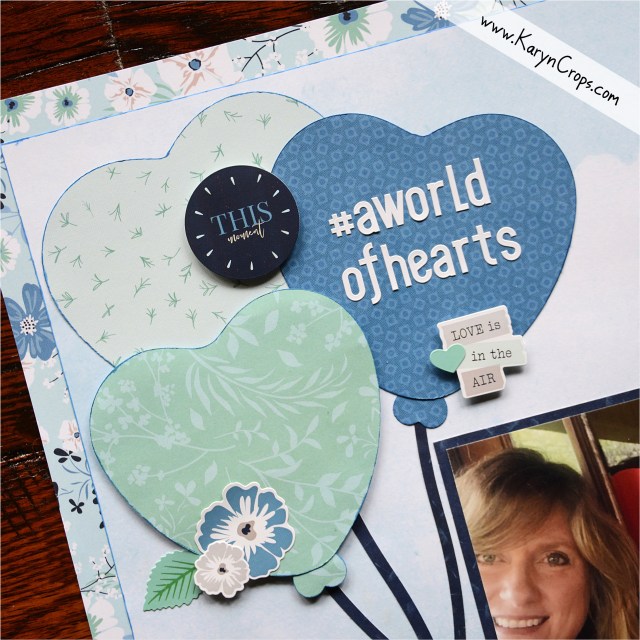
I was inspired by the Mother’s Day post on the CM Blog to create my last layout. Instead of using circles cut with the Custom Cutting System, I punched circles using the Floral Circle Punch to create my heart pieces. This layout is even prettier in person!

To make my layout:
1. Cut two 6″x6″ pieces from the Ombre sheet of paper and punch with the Floral Circle Punch.
2. Cut the two circle pieces into fourths. Please refer to the instructions and diagram on the CM Blog for cutting and arranging the pieces.
3. My photo mats are 4-1/2″ x 6-1/2″ and 3-1/2″ x 4-1/2″.
4. Add embellishments, stickers and journaling as shown.
I love to make pretty pages, and the Daydreamer collection provides the prefect materials! Again – trust me – it’s even more beautiful in person! You can purchase the Daydreamer collection and the tools that I used through my CM website link.
Happy Scrapping!
Karyn


 My example for this layout features a photo of my window display for #aworldofhearts. A few weeks ago, a world-wide movement called #aworldofhearts was created to encourage everyone to decorate their front windows with hearts as a display of love, hope, and unity and also to thank essential workers. Search for #aworldofhearts on Facebook, and you’ll find a page devoted to these creations. They range from sweet and simple to incredibly elaborate. Some are using sidewalk chalk and decorating their driveways and sidewalks too. I wanted to remember this huge heartwarming gesture and created a layout to document it in my scrapbook.