Apple Border Scrapbook Layouts

Hello! I’m in a rush today to get these layouts shared with you. I made my layouts a few days ago, but I just learned that some of the tools that I used are now in limited quantities with Creative Memories and may sell out quickly. If you like these tools and any of the other items in the Last Chance section of our website, I recommend that you purchase them quickly.

Don’t forget that our FREE PUNCH PROMO is still happening until noon CT on September 29th or while supplies last. (It’s possible that the freebie punches will run out before the end of the promo period. So again, please order early if you’re interested.) With a $125 order, you will receive your choice of either the Gifts Border Punch or the Heart Heart Heart Border Punch for FREE! Your order of $50+ through my website link or from me in person will also qualify you for my own $100 Quarterly Shopping Spree Give-Away! I’ll be drawing my next winner on October 1st.

Although the Apple Chain Border Cartridge was released with our Hello, Autumn Collection this month, it’s also great from summer layouts! The two layouts that I’m sharing today are bright and summery. My first layout would be great for photos from a summer picnic or photos from baking in your kitchen. The red gingham paper is from the S’mores Memory Paper that is in the Last Chance section of our website. I also used the Basketweave Border Punch that is also new to our Last Chance section. The Apple Chain Border Cartridge has been a hot seller and is currently sold out but will be returning to our product line in December.


I had fun making this super sweet layout and used a few of my favorite tools – the Songbirds Border Punch, Dazzle Border Punch, Arch Frame Border Punch and the retired Leaf Trio Punch. I also used the Scallop Blade for the 12″ Trimmer.

To make my layout:

1. Use the Scallop Blade for the 12″ Trimmer and cut one long end of a 12″ x 3/4″ piece of White Cardstock. Adhere strip to the top of your 12″x 12″ Black Cardstock.
2. Cut a 12″ x 2-1/2″ strip from red gingham paper (from S’mores Memory Paper) and adhere to the white strip.
3. Punch one end of a 12″ strip of White Cardstock with the Dazzle Border Punch and cut off of your cardstock at 1-1/2″. Adhere to the bottom of the gingham strip.
4. Use the Arch Frame Border Punch to punch a border from Brown Cardstock. Cut the segments apart as shown. Use the Basketweave Border Punch to punch a border from Rich Brown Cardstock cut into almost 2″ pieces and adhere to your basket shapes with Repositionable Tape.
5. Use the Original Border Maker System with the Apple Chain Border Maker Cartridge to punch borders from Scarlet and Leaf Green Cardstock. Cut the tops off of the red border, and adhere the red border to the green border. Use scissors to cut the border apart into 2 apple segments. Put some Repositionable Tape Runner on the bottoms of the apple pieces and tuck them into your basket pieces. Adhere the basket pieces with Foam Squares to the bottom edge of the gingham piece.
6. Use the Songbirds Border Punch to punch a border from Black Cardstock. Adhere the bird border to the bottoms of your baskets.
7. Use the Leaf Trio Punch to punch leaves from Leaf Green Cardstock and adhere underneath your baskets.
8. Use the Scallop Blade for your 12″ Trimmer to cut a narrow 12″ border and adhere to a 12″ x 1/2″ strip of red gingham paper. Adhere to the bottom of your layout.
9. Use the Original Border Maker System with the Apple Chain Border Maker Cartridge to punch borders from Scarlet and Leaf Green Cardstock. Cut the tops off of the red border, and adhere the red border to the green border. Cut the border to 6″ and adhere to the bottom border with Foam Squares.
10. Add faux stitching with a Black Dual-Tip Pen.


My second layout is just as sweet as the first. Although I used a sheet of paper from the Hello, Autumn Tone-on-Tone Paper for my base, the layout also has a summery feel to it. The Lace Trim Border Punch has been one of my favorites, and it’s now in the Last Chance section of the CM website.

I made my darling apple photo mats with the small heart cutting pattern from the Gemstones Cutting Patterns for the Custom Cutting System. I just used my scissors to create a little dip in the bottoms of the heart pieces to make them look like apples instead. I used the new Hello, Autumn Journal Template to trace the leaf pieces for the tops of the apples, but you could free-hand cut some.

To create my layout:

1. Cut a strip of White Cardstock to 12″ x 3-1/2″. Punch one long end with the Lace Trim Border Punch and the other long end with the Dazzle Border Punch.
2. Use the Original Border Maker System with the Infinity Border Cartridge to punch a border from Scarlet Cardstock. Adhere as shown.
3. Use the Original Border Maker System with the Apple Chain Border Maker Cartridge to punch borders from Scarlet and Leaf Green Cardstock. Cut the tops off of the red border, and adhere the red border to the green border. Adhere as shown.
4. Use the Custom Cutting System with the small heart pattern of the Gemstones Cutting Patterns and the Green Blade on the outside edge to cut two heart shapes from Scarlet Cardstock. Use your scissors to cut little dips in the bottoms of the hearts to look like apples. Use the new Hello, Autumn Journal Template to trace the leaf pieces from Leaf Green Cardstock for the tops of the apples.
5. Cut a 6-1/4″ x 4-1/4″ photo mat from Scarlet Cardstock. Cut ribbon pieces from White Cardstock and add pen dots. Add a title sticker from the Hello, Autumn Stickers.


Creative Memories has the BEST scrapbooking tools on the market, and you can purchase them through my CM website link! I hope that I’ve provided some scrapping inspiration for this incredible combination of CM tools! Have a great weekend!

Karyn

National Scrapbook Day Layouts – Part 2

Hello!  I’m back with three more layouts that I made from Creative Memories 2020 National Scrapbook Day Kit.  Please see my post from Friday, August 7th for my first layout.  The National Scrapbook Day Kit is super sweet and still available for purchase.  Please use my CM link to order.  Click on Shop and then Virtual Events on the top menu bar to find the kit.  You may wish to purchase the Bundle as you will also get the extra embellishments that I used for my layouts.

I used up almost all of the paper, stickers and embellishments from the NSD kit to make my four layouts.  Please read the instructions carefully, so you’ll have enough materials to make all four layouts.   To make the second layout that I’m sharing today, you’ll need a piece of reserved paper that you cut from my first layout from August 7th (Step 1).

KarynCropsNSDLayouts - Page 011

For my second layout, I created a woven basket piece as a background with the strawberry print paper to highlight a special photo from my granddaughter’s first birthday party.  The circular piece created with the Floral Circle Punch reminds me of the crocheted doilies that my grandmothers used to create.

KarynCropsNSDLayouts - Page 010


To create my layout:

1.  Cut a hollow frame from a sheet of Scarlet Cardstock.  Set aside the cut out square to use for the next layout.  Cut the strawberry paper to 11-1/2″ x 11-1/2″ and adhere over the hollow frame.
2.  Cut strips of the dark green and light green papers to 7/8″ x 6″  and 7/8″ x 10-1/8″.  Cut strips of White Cardstock to 1″ x 6-1/8″ and 1″ x 10-1/4″.  Adhere the green strips on top of the white strips.
3.  Evenly position the shorter dark green pieces in the lower center part of your page, and adhere the tops of the pieces with Tape Runner.  Weave through the longer light green pieces, and slide the three long pieces until they’re evenly spaced. Adhere the ends with Tape Runner.  Adhere the bottoms of the dark green pieces.
4.  From Evergreen Cardstock (or Dark Green Cardstock), use the Floral Circle Punch to punch a circle and then trim as shown.  Use the Custom Cutting System with the smallest Circle Pattern and Red Blade on the outside edge to cut a circle from White Cardstock.  Trim as shown and adhere to the floral circle piece.  Add faux stitching with a Dual-Tip Black Pen.
5.  Mat a photo with White Cardstock measuring 4-1/4″ x 6-1/4″.
6.  Add embellishment pieces with Foam Squares as shown.


KarynCropsNSDLayouts - Page 004

Although I didn’t grow strawberries, my blueberry bushes exploded with an abundance of berries this year!  I found myself competing with the backyard wildlife, and I had to hustle to pick my ripe berries before the birds and squirrels ate them.  My battle with the birds inspired my next layout that features a row of birds sitting above the strawberry patch.  The lovely Songbirds Border Punch has been one of my favorite CM punches this past year.


KarynCropsNSDLayouts - Page 002

To make my layout:

1.  Cut a piece of strawberry paper to 12″ x 4″ and adhere to the bottom of the green striped paper.  I positioned my stripes to run horizontally.  Use the Original Border Maker System with the new Ruffle Trim Border Maker Cartridge to punch a border from Scarlet Cardstock, and adhere to the strawberry strip.
2.  Cut a piece of Scarlet Cardstock to 9-1/4″ x 10″.  From the center of your piece, use the Custom Cutting System with the small heart pattern from the Gemstone Cutting Patterns and Green Blade on the outside edge to cut two heart photo mats.  Also cut a 4-1/4″ x 6-1/4″ piece to use as a photo mat.  When cutting these pieces, make sure to leave an edge around your cardstock as you will use this now hollow piece as a frame for the leftover gray dot piece from the first layout (See my post from August 7th.)  The gray dot piece measures 9″ x 9″, so position it towards the bottom of the scarlet frame piece.
3.  From Evergreen Cardstock (or Dark Green Cardstock) punch a 9″ border using the Lace Trim Border Punch.  Cut off of your cardstock at 2″.  Position this piece on top of the gray dot piece leaving the Scarlet Cardstock frame showing.
4.  Use the Songbirds Border Punch to punch a row of birds from Evergreen Cardstock.
5.  Adhere pieces as shown and add stickers and embellishments as shown.  I used Foam Squares for my ribbon pieces at the top of the layout.


KarynCropsNSDLayouts - Page 008

My last layout evokes another garden scene of picking strawberries.  I created a strawberry patch with the On the Vine Border Punch and heart punch outs.  The sweet little basket was inspired by my scrapping buddy, Fran Smitherman, who shared several ideas for creating baskets on our Creative Life Scrapbooking Facebook page.


KarynCropsNSDLayouts - Page 006

To make my layout:

1.  Cut a 12″ x 3″ piece of strawberry paper and adhere to the top of the gray dot paper.  Use the Original Border Maker System with the new Ruffle Trim Border Maker Cartridge to punch a border from Scarlet Cardstock, and adhere to the strawberry strip.
2.  Use the On the Vine Border Punch to punch a border from Evergreen Cardstock (or Dark Green Cardstock).  Adhere to the bottom of the page.  Use the Original Border Maker System with the Heart Duet Border Maker Cartridge to punch hearts from Scarlet Cardstock.  Use a black pen to add detail to the hearts and adhere over the circles in the vine piece.
3.  Use the Floral Circle Punch to punch a piece from White Cardstock and trim as shown. Adhere to top of the page.
4.  Add two 4-1/4″ x 6-1/4″ photo mats from Scarlet Cardstock.
5.  Use the Basketweave Border Punch to punch a piece from Brown Cardstock.  Trim with scissors as shown.  To create the handle, use the Custom Cutting System with the medium sized Circle Pattern and the Blue and Red Blades to cut a hollow frame piece.  Cut on the inside edge with the Blue Blade first and then without moving the cutting pattern, cut again with the Red Blade.  Trim with scissors to fit the basket piece.
6.  Add stickers, embellishments and a bird punched with the Songbirds Border Punch. Adhere some with Foam Squares as shown.

 
I hope you like these super sweet pages!  Don’t feel like you need “strawberry” photos for them.  Just use photos of your family members – or maybe stage some photos eating strawberry shortcakes or strawberry ice cream : )

Please note that the new Ruffle Trim Border Maker Cartridge sold out during CM’s promo last month. CM has ordered more of this cartridge, and it is expected to be back in stock in November.  To place an order, please use my Creative Memories website link.

Thanks so much for visiting with me, and I’ll be back at the end of the month with the Creative Life Scrapbooking 2020 Summer Blog Hop!

Karyn

2020 National Scrapbook Day Layouts – Part 1

Well, it’s better to be late than never!  As we start to think about Croptoberfest, I’m finally sharing the four layouts that I created with the 2020 National Scrapbook Day Kit from Creative Memories.  I normally hold a large all-day workshop and/or weekend retreat to celebrate National Scrapbook Day, but I had canceled my event for this year due to the pandemic.  I held back on sharing these layouts as I held onto the hope of holding an in-person event.  But with new infection rates rising in my local area, it’s time to finally share these layouts.

Today I’m sharing the first of my four layouts.  Please visit with me next week as I share the other three.  I will be making my layouts with the participants of my Virtual Camp Crop-A-Lot Weekend Retreat this weekend (August 7th – 9th).  In addition to these layouts, I’ll also be teaching 5 other page classes, sharing some demos, offering challenges, door prizes and products at special prices.  I’ve created a private Facebook group for the event and will be teaching and recording the classes via Zoom.  The virtual event begins at 5 pm CT today (August 7th).  If you would like to join the fun, please pay your $25 registration fee ASAP using my Pay Pal link.

KarynCropsNSDLayouts - Page 009
I love to make pretty pages, and the National Scrapbook Day Kit provided some super cute materials to make some really pretty pages!  The strawberry motif made me think of picking strawberries in my garden and old-time kitchen scenes with lace curtains, baskets and mason jars.   I channeled these images to create my layouts, and I used up almost all of the materials in the kit and the extra embellishments along with some extra sheets of cardstock.

KarynCropsNSDLayouts - Page 007

To make my first layout:

1.  Cut a 9″ x 9″ piece from the left-center of the black plaid paper.  Make sure to leave space on the left edge of the plaid paper.  Set the cut-out piece aside to use on another layout.  Cut a 10″ x 10″ piece from Scarlet Cardstock and adhere over the cut out space on the plaid paper.  Add faux stitching with Dual-Tip Black Pen.
2.  Use the Custom Cutting System with the smaller of the Rectangle Cutting Patterns and the Green Blade on the outside edge to cut a rectangle from the green striped paper.  I positioned the stripes on the paper to run horizontally.  From the gray-wash print paper, freehand cut a small rectangle shape to use as the lid of your mason jar.  Use a Dual-Tip Black Pen to draw details on the jar and lid.  Don’t adhere the lid yet.
3.  From the dark green paper, use the 12″ Decorative Trimmer to cut three narrow 1/4″ flower stems from the swell side of the trimmer.  Adhere these to your jar and then adhere the jar lid.  Use the old Cherry Blossom Punch to punch three flowers from White Cardstock and add detail with black pen.  Adhere the flowers with Foam Squares and add additional stickers as shown.
4.  From Black Cardstock, punch a 10″ border using the Dazzle Border Punch.  Trim off of your cardstock at 1-1/2″, and adhere to the bottom of the scarlet piece.
5.  Add two 6-1/4″ x 4-1/4″ photo mats cut from Aqua Cardstock.
6.  Add additional stickers and embellishments as shown.


You may purchase the tools that I used and also the exclusive National Scrapbook Day Kit through my Creative Memories website link or get one from me personally.  If you order online, click on “Shop” and then look for the “Virtual Events” tab.  Make sure to purchase the bundle as you’ll receive the extra embellishments that I used.  Keep in mind that the kit also contains instructions from Creative Memories to make two layouts.  So you many wish to purchase two of the kits in order to create CM’s layouts and also mine.

35b1d598-1a14-410f-b246-0188a71272d0

Please come back and visit with me next week when I share 3 more layouts that I created from the 2020 National Scrapbook Day Kit!

Have a great weekend,
Karyn


Karyn

Vitamin Sea Scrapbook Layouts

Hi, everyone!  Here are two layouts that I just shared during the Creative Life Scrapbooking Summer 2020 PJ Party virtual crop.  The PJ Party began at 4 pm ET and continues until 1 am ET over at the Creative Life Scrapbooking Facebook Page.  Just go to our home page and scroll to see all of the posts.  Today we’re sharing different ways to use the Custom Cutting System from Creative Memories.  The posts will remain on our Facebook page, so you’ll be able to refer to them in the future.

KarynCropsCLSPJParty7-31-20 - Page 011

For my first layout, I cut hollow frames using the Custom Cutting System.  You can use this technique with any of our Custom Cutting Patterns.  When making hollow frames just remember to always use the blade that cuts the furthest away from the cutting pattern first.  After making your first cut, don’t move the cutting pattern and use the second blade to cut again.  You can use this method on the outside edge or the inside edge of the cutting patterns.

I created my first layout using a combination of layered circles and hollow circle frames to create an interlocking circle pattern.  It’s not difficult, but it’s just a little tedious cutting all of the circle pieces.  I used the new Vitamin Sea Collection to make my layouts.  I love all of the pieces of this collection!  The coordinating shades of teals, greens and blush are especially beautiful!

KarynCropsCLSPJParty7-31-20 - Page 012

To make my layout:

1.  Use the Custom Cutting System with the medium Circle Cutting Pattern and Green Blade on the inside edge to cut 5 circles from green paper, 5 circles from teal paper and 10 circles from blush paper.
2.  Use the Custom Cutting System with the medium Circle Cutting Pattern and Red Blade on the inside edge to cut 10 circles from Dark Sea Green Cardstock.  Adhere the green and teal circles onto the cardstock circles.
3.  Use the Custom Cutting System with the medium Circle Cutting Pattern and the Green Blade on the inside edge to cut a circle from Dark Sea Green Cardstock.  Don’t move the cutting pattern from your cardstock.  Cut again using the Red Blade on the inside edge of cut 10 hollow circle frames.  (Save the resulting circles for my second layout.)


4.  Use a pencil to lightly draw a circle around the outside edge of the Jumbo Circle Cutting Pattern onto your background paper. If you don’t have the Jumbo Circle Cutting Pattern, you can use an 11″ dinner plate.  Evenly arrange blush circles in a circle pattern with the top edges of the circles on the pencil line.
5.  Evenly arrange the teal and green circles so that they partially overlap the blush circles making sure to line up the top edges of the circles with the pencil line.  Erase your pencil marks.
6.  Adhere the 10 hollow circle frames on top of the blush circles.
7.  Use the Original Border Maker System with the Kissing Fish Border Maker Cartridge to punch two borders from Dark Sea Green Cardstock. Cut the fish apart into pairs as shown. Adhere the fish pairs in the centers of the blush circles.
8.  I finished my layout by adhering a matted photo with Foam Squares and some Vitamin Sea Stickers and pieces of a Vitamin Sea Laser Cut Border that I cut apart.

KarynCropsCLSPJParty7-31-20 - Page 013

To create my second layout, I used the leftover cardstock circles from my first layout.  I love how this layout shows off the lovely patterns of the Vitamin Sea Designer and Tone-on-Tone Papers and the adorable Vitamin Sea Stickers!

To make my layout:

1.
KarynCropsCLSPJParty7-31-20 - Page 007

2.
KarynCropsCLSPJParty7-31-20 - Page 008

3.  Adhere the blush/cardstock piece on top of the background paper covering up the space that was cut out.
4.  Use the Custom Cutting System with the medium Circle Cutting Pattern and the Blue Blade on the inside edge to cut 9 circles from patterned paper. Adhere these circles on top of your leftover Dark Green Sea Cardstock circles from the first layout.  (These pieces were cut using the Custom Cutting System with the medium Circle Cutting Pattern and the Green Blade on the inside edge.)
5.  Complete your layout by adding a title piece cut from a Vitamin Sea Variety Mat, photos, journaling, and some Vitamin Sea Stickers adhered with Foam Squares.

KarynCropsCLSPJParty7-31-20 - Page 014

If you have some beach or tropical photos to scrapbook, you’re going to LOVE the Vitamin Sea Collection!  Make sure to check out the Vitamin Sea Embossed Embellishments and the Vitamin Sea Laser Cut Borders as they are especially nice!  You may purchase any of the materials that I used for my layouts through my Creative Memories website link.

Thanks so much for visiting with me and make sure to check out the Creative Life Scrapbooking Summer 2020 PJ Party for more ideas for the Custom Cutting System.

Karyn

Electric Summer Scrapbook Layouts – Part 3

Hi! I’m back with more Electric Summer layouts! This collection from Creative Memories just puts me in a happy mood! Once I started scrapping with it, I couldn’t stop!

There’s a lot happening in my first layout, but that’s okay. The busy layout expresses all of the fun that we were having that day.  The Electric Summer Stickers and Electric Summer Layered Embellishments are super fun and really make this layout!

KarynCropsElectricSummer2 - Page 001

To make my layout:

1. Use the Custom Cutting System with the largest circle from the Circle Cutting Patterns and the Blue Blade on the outside edge to cut two circles from Electric Summer Paper. Center the cutting pattern on top of the circles and use the Green Blade to cut thin hollow circles.  Layer and adhere the pieces onto a sheet of White Cardstock.

IMG_2739

IMG_2739


2. Crop photos to 4″ x 4″ and mat with 4-1/4″ x 4-1/4″ pieces of Electric Summer Paper.  Adhere photos to the layout as shown.
3. Add a variety of Electric Summer Stickers and Electric Summer Layered Embellishments and Gemstones as shown.  Use Foam Squares to adhere some of the pieces.
4. Add faux stitching and journaling with a Black Dual-Tip Pen.


KarynCropsElectricSummer6 - Page 011


My second layout was an exercise in total frustration for me!  It’s also a great testament to the Recipe Templates from Creative Memories!  The Recipe Templates make is super simple to create mosaic-type layouts.  All you need to do is trace, cut and tape, and all of the angles and measurements are figured out for you.  We currently have two different Recipe Templates available to purchase, and you can see them through my CM website link.

I wanted to create a diagonally orientated layout that spread across two pages.  I laid out all of my pieces, marked and cut them.  But they didn’t fit back together perfectly after they were cut.  The end result looks pretty good, but my white cardstock pieces ended up a little short for me.

KarynCropsElectricSummer6 - Page 010

To create my layout:

1.  Punch borders from Electric Summer Paper using the Scallop Burst Border Punch and the Original Border Maker System with the Cloud and Flip Flops Border Maker Cartridges.  I used the Tahitian Blue Cardstock from the most recent Creative Memories Cardstock Buffet for my flip flop borders and background pieces.
2.  Lay your photos and border pieces on top of White Cardstock at an angle.  Cut the pieces to fit.

IMG_2763


3.  After your pieces are cut and adhered, cut the White Cardstock pieces to fit on top of Tahitian Blue Cardstock.
4.  Embellish your layout with Electric Summer Variety Mats and Stickers.  Adhere some of the pieces with Foam Squares.

Thanks so much for visiting with me today!  And please check out my Creative Memories website link for any CM tools or materials that you may wish to purchase.  From now until noon CT on June 30th or while supplies last, CM is offering a Punch Promo!  With any $125 purchase, you will receive either your choice of the Grasslands Border Punch or the Sun Punch for FREE!

Happy Scrapping!
Karyn


Electric Summer Scrapbook Layouts – Part 1

Yay!  Summer is finally here!  And the Electric Summer collection from Creative Memories perfectly captures our elation for the start of the new season. The Electric Summer collection is bright, cheerful and super fun.  I’ll be using it to create summer layouts for my grandchildren and also for my lake and beach photos.

 
Click here to view a video of all of the pieces of the Electric Summer collection.
Click here to purchase the Electric Summer collection.

Some pieces of the Electric Summer collection are currently sold out, but CM expects them to be back in stock later this month and next.

af8b79d7-17c7-4e65-805f-49fd9bd10f13


My first layout features a fun technique to create a scalloped rainbow wave that brings movement to the page.  I also used the Hyacinth Dot Pen to add some additional movement and detail to the layout.  CM currently has dot pens in three colors, but they are in limited quantity.  We’ve been told that CM will be releasing more of these pens in different colors.  You’ll find the Hyacinth, Island Coral and Kiwi Dot Pens in the Last Chance section of our website.

KarynCropsTecniqueTuesday5

To create my layout:

1.  Use the Custom Cutting System with the medium sized circle from the Circle Cutting Patterns and the Green Blade on the inside edge to cut three circles from six different colors of the Electric Summer Paper.  Lightly fold the circles in half to find the center and score.  Use your Personal Trimmer to cut the circles in half.
2.  Arrange the circles on your background paper as shown above.
3.  Use the Hyacinth Dot Pen to add dot details around the upper portion of the layout as shown.
4.  Mat and add photos.  Journal on a mat from the Electric Summer Variety Mats.
5.  Decorate your layout with Electric Summer Layered Embellishments and Electric Summer Stickers using Foam Squares to adhere some .

KarynCropsElectricSummer - Page 005


For my second layout, I used the 12″ Trimmer with the Perforating Blade to add some subtle detail.  Although I only used small pieces of the Electric Summer Paper, the layout is bursting with color and fun.

KarynCropsElectricSummer1 - Page 006

KarynCropsElectricSummer1 - Page 008

To create my layout:

1.  Use the 12″ Trimmer with the Perforating Blade to score/cut your background cardstock 1/4″ from the four edges.  Score/cut a second edge 1″ from the outside of the four edges.  Press hard enough to get the perforating marks on your cardstock but not hard enough that it cuts all of the way through and separates.
2.  Cut 20 strips of Electric Summer Paper to 1/2″ x 1-7/8″.  Cut four 1/2″ X 1/2″ squares.  Adhere the pieces onto the layout as shown.
3.  Use the Custom Cutting System with the largest circle from the Circle Cutting Patterns and the Red Blade on the outside edge to cut a semi-circle from the cloud print paper.
4.  Mat photos with Grape Cardstock.
5.  Add Electric Summer Stickers and Electric Summer Layered Embellishments as shown using Foam Squares to adhere some.
6.  Add dots with the Hyacinth Dot Pen as shown.
7.  Cut and add an Electric Summer Variety Mat to use for your journaling.


KarynCropsElectricSummer1 - Page 009

Some of my croppers like to make seasonal samplers to display on their Wooden Frame Hangers or old Everyday Display Frames.  The samplers can also be used as an intro page in an album or as a “filler” page in an album.  I designed this summer sampler so it could be used with our without photos.  I selected the variety mat as the dominate feature as the saying perfectly captures the spirit of summer for me and brings back memories of my dad singing Summertime to me when I was a young girl.

To make my layout:

1.  Cut a hollow frame from a piece of Lily Pad Cardstock from the recent CM Cardstock Buffet.  Cut a piece of White Cardstock to 11-1/2″ x 11-1/2″ and adhere to the hollow frame.
2.  Use the Custom Cutting System with the square cutting pattern from the Rectangle Cutting Patterns and the Green Blade on the inside edge to cut squares from the Electric Summer Paper.  Use the Red Blade to cut squares from the Lily Pad Cardstock.  Adhere the piece together and to the layout.
3.  Mat the Electric Summer Variety Mat with Lily Pad Cardstock.
4.  If desired, crop photos to 3″ x 4″, and mat with Lily Pad Cardstock.
5.  Use the Original Border Maker System with the new Flip Flop Border Maker Cartridge to punch a border from White Cardstock.  Trim the border off of the cardstock at 1-3/16″.  Cut into two 3″ pieces.  Mat the pieces with 3-1/4″ x 1-1/4″ pieces of Lily Pad Cardstock.
6.  Add Electric Summer Stickers adhering with Foam Squares.  Add Electric Summer gemstones.

KarynCropsElectricSummer1 - Page 010

I hope that my layouts have inspired you to add the Electric Summer collection to your CM Wish List.  You may purchase the materials and the tools that I used through my CM website link.

Make sure to come back and visit with me next week when I share more Electric Summer layouts!

If you like to participate in virtual crops, you may wish to join me on my private Facebook group, Karyn’s Croppers, for a Virtual Beach Party Crop on Friday, June 26th.  I’ll be sharing ideas and challenges and offering door prizes!  I’ll be using the Electric Summer collection for my samples, but you may use any materials.  The fun runs from 6:00-11:00 PM CT.  (In order to be eligible to win door prizes, I’m asking that you make a minimum $25 purchase through my website from June 1st – 26th.  You can still participate in the fun even if you don’t make a purchase.)

Happy Summer!
Karyn


Home-Bound Throw-Down Challege – Week 4

Hello and welcome to the fourth week of my Home-Bound Throw-Down challenge!  I’m still using the Spring Medley collection from Creative Memories and really loving the fresh shades of blue and green.  Plus there’s a nice mix of small, large and tonal patterns.

I was inspired by the title “Living our best life right now” on the Variety Mat.  So I created a layout to document the ways that my husband and I are staying busy during the Covid-19 pandemic.  I was even able to persuade my husband to do his own journaling!  I added the “Rain or Shine” sticker to the “Love Grows” embellishment as it reminds me of our wedding vows, “for better for worse, in times of sickness or health…“.

KarynCropsApril2020 - Page 084

To create my layout:
1.  Use the Custom Cutting System with the smaller heart from the Gemstones Cutting Patterns to cut 5 hearts from patterned paper using the Green Blade on the outside edge.  Use the Red Blade on the outside edge to cut 3 hearts from light print paper, and adhere to three of the larger patterned hearts.
2.  Cut your photo and Variety Mat to 3″ x 3-3/4″.  Cut photo mats to 3-1/4″ x 4″.  Adhere.
3.  Add journaling, embellishments and stickers as shown.

KarynCropsApril2020 - Page 085

HomeBoundThrowDown#7

My next layout is simply a pretty page that features the new Spring Leaf Chain Border Maker Cartridge and Baroque Border Punch.  And I also used our new Dark Sea Green Cardstock.  For some of my past layouts, I used Navy Cardstock with the Spring Medley collection.  Cloud, Peacock, Beige and White Cardstock also look nice with this collection.

HomeBoundThrowDownPhotos#8 - Page 001

To make my layout:
1.  Cut six strips that measure 2″ x 6″ and adhere onto a 12″x 12″ sheet of designer paper.
2.  Use the Original Border Maker System with the Spring Leaf Chain Border Maker Cartridge to punch 3 borders from Dark Sea Green Cardstock and cut in half at 6″.  Adhere these pieces in-between the strips.
3.  From Dark Sea Green Cardstock, use the Baroque Border Punch to punch a border and adhere at the bottom of the strips.  Add a sticker strip to the top of the border piece.
4.  Add 4-1/4″ x 4-1/4″ photo mats from White Cardstock.
5.  Use the Custom Cutting System with the medium sized Circle Pattern and the Red Blade on the inside edge to cut a circular journaling box.
6.  Add stickers and embellishments with Foam Squares as shown.

HomeBoundThrowDownPhotos#8 - Page 002HomeBoundThrowDown#8

You can purchase any of the materials and tools that I used on my Creative Memories website. 

Make sure to check out the PJ Party virtual crop hosted on Facebook by Creative Life Scrapbooking today (April 24th)!  The fun begins at 4:00 EDT time, and I’m hosting the second hour.

I’ll be back next week with two more Home-Bound Throw-Down challenges!  Take care until then!

Karyn

Home-Bound Throw-Down Challenge – Week 3

Well, we made it through another week of self-isolation.  Congrats to us!  At this point, it’s somewhat beginning to feel almost normal.  Below is an excerpt from a post that I made to Karyn’s Croppers earlier in the week.

There’s no denying it – we’re living through a historic event. I like to think of my personal scrapbook albums as my diary, and I need to include the Covid-19 Pandemic in my scrapbook. There are different ways that we could approach this topic in our albums, and I encourage you to think about how you are going to document this time. After all, we are the memory keepers and storytellers.

I decided to do what I always do – take photos of my life. These photos will be of things that I’m doing now – photos of me and my husband and what we’re doing, photos of my garden, photos of food that I’m cooking, photos related to my CM business. So my photos and journaling will be a reflection of how the virus is impacting our daily life. These photos will show how our daily life has changed. Instead of photos of us out and about, there will be photos of us doing things at home. There will be photos of us wearing masks, washing groceries, and having zoom calls with friends and family. Absent will be photos of us with the kids and grandkids. I decided not to create a dedicated album to the virus but to rather just incorporate it into my annual chronological family album.

So with this in mind, my next challenges for our Home-Bound Throw-Down  feature layouts that you can use to document the Covid-19 pandemic in your albums.  But the layouts are versatile enough that you can use them for any of your photos.

HomeBoundThrowDown#5
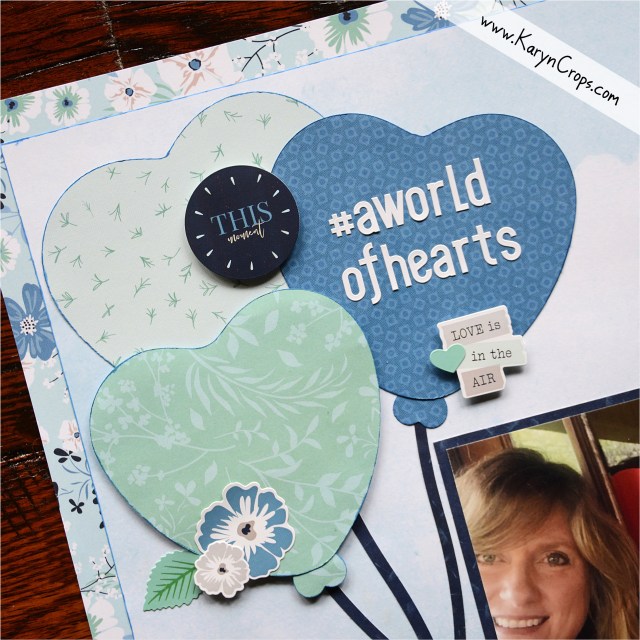
My example for this layout features a photo of my window display for #aworldofhearts.  A few weeks ago, a world-wide movement called #aworldofhearts was created to encourage everyone to decorate their front windows with hearts as a display of love, hope, and unity and also to thank essential workers.  Search for #aworldofhearts on Facebook, and you’ll find a page devoted to these creations.  They range from sweet and simple to incredibly elaborate.  Some are using sidewalk chalk and decorating their driveways and sidewalks too.  I wanted to remember this huge heartwarming gesture and created a layout to document it in my scrapbook.

HomeBoundThrowDown5Photo

I used designer paper, tone-on-tone paper and stickers from the very lovely Spring Medley collection from Creative Memoriesto create my layout.

1.  Cut a hollow frame from the floral paper.
2.  Cut the cloud paper to 11″ x 11″.  Rub the round-tip edge of a Dual-Tip Pen around the perimeter of the paper to create dimension and definition.  Adhere to the floral frame.
3.  Use the Custom Cutting System with the smaller heart pattern from the Gemstone Cutting Patterns and all three blades to cut and create balloons.  Use the old Small Heart Maker punch to create the bottom pieces of your balloons.  Rub the round-tip edge of a Dual-Tip Pen around the perimeter of the hearts to create dimension and definition.  Use the 12″ Decorative Trimmer to cut 1/8″ balloon strings.  Adhere the top balloon with Foam Squares.
3.  Add a title with White Sans Serif ABC/123 Stickers.  Add Spring Medley Stickers using Foam Squares and journaling to complete your page.

HomeBoundThrowDown5Photo2


HomeBoundThrowDown#6

When I get over-whelmed with the stress, anxiety and major disruptions that the Covid-19 pandemic has caused in my life, I like to remind myself that “things can always be worse”.  This has proven to be true in most of the bad times that I’ve experienced.  And despite the awfulness, there are always blessings to be counted.  So when I start feeling a little down about the current situation, I just remind myself of all the things for which I’m grateful.  I created the layout below as a reminder of some of my blessings during this pandemic.

HomeBoundThrowDown#6 - Page 082

Again I used paper, stickers and embellishments from the Spring Medley collection.  I printed my photos on my home computer in wallet size – 2-1/2″ x 3-1/4″ and matted them on Navy Cardstock.

1.  Use the Custom Cutting System with the larger heart pattern from the Gemstone Cutting Patterns and the Red Blade to cut hearts from the paper.  Use the Green Blade on the outside edge to cut hearts from Navy Cardstock.  Adhere the pieces and add faux pen stitching with a navy pen.
2.  Mat photos with 2-3/4″ x 3-1/2″ pieces of Navy Cardstock.
3.  Cut White Cardstock into 2-1/4″ x 1/2″ strips and add your blessings.
4.  Add a title with White Sans Serif ABC/123 Stickers.  Journal on a tag from the Spring Medley Embellishments.  Adhere the tag and floral stickers from the Spring Medley Stickers with Foam Squares.  Add faux pen stitching around the perimeter of your layout.

I hope that you have many blessings to count and record!  You may purchase any of the materials that I used on my Creative Memories website.  I’ll be back next week with two more layouts.

Have a nice weekend,
Karyn

Creative Life Scrapbooking 2020 Winter Blog Hop – Winterberry Scrapbook Layouts

Hello and welcome to our Creative Life Scrapbooking 2020 Winter Blog Hop!  Eight of our nine members are sharing a variety of scrapbooking layouts and ideas today, and  I’m excited to be the first stop on our hop!  Just follow the links at the bottom of my post to continue on our 2020 Winter Blog Hop to see more great ideas.


I used the Winterberry Collection from Creative Memories to make some winter layouts to share with you. This collection is full of pale blue and muted purple tones and was perfect for some photos from a winter photo shoot of my son and his family.

My first layout is a double-page spread that is based on a sampler grid pattern.  The first page of my layout is hanging in my kitchen on my old Everyday Display Frame, and I enjoy looking at each day.  I used the Platinum Shimmer Cardstock as the base of this layout and a variety of punches that Creative Memories released this winter.

KarynCropsCLSWinterBlogHopWinterberry - Page 060

To make my layout:

1. Cut twelve 3-1/2″ x 2-1/8″ pieces of Navy Cardstock.
2. Cut twelve 3-1/4″ x 1-7/8″ pieces of Winterberry Paper.
3. Cut four 4-1/4″ x 6-1/4″ photo mats from Navy Cardstock.
4. Cut two 2″ x 6-1/4″ pieces of Navy Cardstock.
5. Cut two 1-3/4″ x 6″ pieces of Winterberry Paper (I used the tree print paper.).
6. From Navy Cardstock, use the Pine Cone and Pine Tree Punches to punch 8 pinecones and 8 pine trees.
7. Use the Original Border Maker System with the Crystal Chain Border Maker Cartridge to punch 2 borders from Navy Cardstock. Cut apart into four 3-1/4″ pieces.
8.  Use the Charming Village Border Punch to punch a border from Navy Cardstock and cut apart into two 1-3/4″ pieces.  If you don’t have this punch, you could substitute with the Original Border Maker System with Evergreen Border Maker Cartridge.
9. Assemble onto Platinum Shimmer Cardstock as shown adding Winterberry Stickers with Foam Squares.

KarynCropsCLSWinterBlogHopWinterberry - Page 059

KarynCropsCLSWinterBlogHopWinterberry - Page 058


For my second layout, I created a frosty scene with the lovely tree print paper, a combination of punches, a laser border piece and the unexpected use of Brown Cardstock – and I’m quite pleased with the result!  The Branch Border Punch and the Pine Cone Punch were limited edition punches that were only available through a promo this fall and then later available to purchase for a very short time.  If you missed out on these punches, please contact me as I have a few in my personal inventory.  I’ve gotten a lot of use out of both of these punches and shared a variety of borders made with them in my December blog posts.

KarynCropsCLSBlogHop2-26-20 - Page 008

To make my layout:

1.  Cut the tree print paper to 11″ x 11″ and adhere onto a hollow frame of 12″ x 12″ Brown Cardstock.
2.  Adhere a 12″ x 1-1/4″ strip of blue dot paper to the top of the layout.
3.  Use the Branch Border Punch to punch two borders from Brown Cardstock and use the Silver Dual-Tip Pen to add ice to the branch pieces.
4.  For the top border, adhere the icicle Laser Cut Border Embellishment to the branch piece and adhere the completed piece to the layout with Foam Squares.  Use the Songbirds Border Punch to punch birds from Crimson Cardstock, cut the birds apart with scissors, and adhere the birds to the branch.
5.  From Brown Cardstock, cut two 4-1/4″ x 6-1/4″ photo mats.
6.  Trim the second branch piece to 9″ and adhere to the bottoms of your photos.  Use the Pine Cone Punch to punch pinecones from White and Brown Cardstock.  Layer and adhere to the layout with Foam Squares.  Add a punched out bird piece.
7. Add title sticker.


My next layout is super sweet but yet easy to assemble and shows off the incredibly beautiful Winterberry Laser Cut Border Embellishments.  I also used the Dazzle Border Punch which depending upon how you use it, can give you a sweet, elegant or playful look to your layout.

KarynCropsCLSBlogHop2-26-20 - Page 003

To make this layout:

1.  Cut a 12″ x 3-3/4″ piece of white cardstock, and punch one end with the Dazzle Border Punch.  Adhere two Laser Cut Border Embellishments to the top of the border.
2.  Cut two 4-1/4″ x 6-1/4″ photo mats from the blue dot paper.
3.  Use the Custom Cutting System with the large and small hearts from the Gemstone Cutting Patterns to cut hearts from white cardstock and a Winterberry Variety Mat using the Red Blade on the outside edge of each cutting pattern.
4.  Using the Songbirds Border Punch, punch birds from light blue paper.
5.  Assemble layout as shown adding stickers with Foam Squares.
6. Add blue dots and journaling to the large white heart with a blue pen.
The Winterberry Variety Mats are especially lovely, and I used one on my layout below.  On top of the mat, I layered some Winterberry Stickers and songbird punch-outs to create a beautiful focal point.

KarynCropsCLSBlogHop2-26-20 - Page 005

To make my layout:

1.  Cut a 5″ x 12″ piece of the light purple paper and layer on the right side of the botanical print paper.
2.  Use the Dazzle Border Punch to punch borders from light purple and light blue papers.  Trim to 2-1/2″, layer the pieces, and adhere to the left side of the layout.  Add a Winterberry Laser Cut Embellishment piece.
3.  Cut photo mats to 3-1/2″ x 4-1/2″, and use the Songbirds Border Punch to punch one bird section and adhere with Foam Squares.
4.  Add a Winterberry Variety Mat and layer with a photo and photo mat cut with the Custom Cutting System with the smallest Circle Pattern with the Red and Green Blades.
5.  From a dark purple variety mat, use the Songbirds Border Punch to punch a bird piece.  Trim to 4-1/2″ and adhere with Foam Squares.  Add stickers with Foam Squares.

KarynCropsCLSBlogHop2-26-20 - Page 004


You may purchase the Winterberry Collection and most of the tools that I used on my Creative Memories website.  Please note that the Branch Border Punch, the Pine Cone Punch, and the Charming Village Border Punch are retired items.  If you would like to purchase a Branch Border Punch or Pine Cone Punch, please send me a message as I have a few in my personal inventory.

Thanks so much for visiting with me today!  I hope that I provided a little inspiration for your winter photos.  Please follow the links below to continue on our Creative Life Scrapbooking 2020 Winter Blog Hop and enjoy!

Karyn

Stop 1:  Karyn from Karyn Crops (You are here.)
Stop 2:  Diana from D. Brinsley’s Memory Keeping Blog
Stop 3:  Lisa from Lisa’s Workshop
Stop 4:  Noreen from Organized and Creative Mom
Stop 5:  Krista from Scrappin with Krista
Stop 6:  Meggan from The Printed Project
Stop 7:   Tammy from Photos2Albums
Stop 8:  Tessa from Tessa Scrapbooks

Croptoberfest 2019 Scrapbook Layouts

Happy Croptoberfest season!  This is probably my favorite scrapbooking time of the year!  During the summer months, I usually spend a little less time on my scrapbooking projects and my Creative Memories business as I’m busy with outdoor activities and summer trips.  But I am always anxious to get back in my craft room to start scrapping again, planning my fall scrapbooking events and seeing my scrappy friends!

I typically hold an all-day workshop for Croptoberfest at the end of September and a weekend scrapbooking retreat in October.  (I have a few open spots for my Camp Crop-A-Lot Weekend Scrapbooking Retreat on October (24th) 25th – 27th.  If you would like to attend, please contact me ASAP.)

Each year, Creative Memories releases an exclusive page kit for Croptoberfest.  The kit comes packaged with paper, cardstock, stickers and instructions to make two double-page layouts and is only available from a CM advisor.  We had fun making these pages at my Croptoberfest workshop last week, but I had more fun using the materials to make my own layouts!

KarynCropsCroptoberfest2019Layouts - Page 012

The small prints of the Croptoberfest paper, evoked a warm fuzzy feeling and inspired a quilt-like layout.  I used a sheet of our Beige Cardstock as my base.  Start by cutting the patterned paper into 1-1/4″ squares and adhere leaving about 1/8″ space in-between.  Use the new Songbird Border Punch to punch a border from the brown cardstock in the kit, and adhere on top of your border.  My photo mats are 4-1/4″ x 4-1/4″ and 6-1/4″ x 4-1/4″.  The circle mat was cut using the Custom Cutting System with the smallest Circle Pattern and Green Blade on the outside edge.  Decorate with some of the Croptoberfest stickers and embellishments from the Croptoberfest Gift Embellishment Pack (also only available from a CM advisor).  I adhered all of my stickers and embellishments with Foam Squares and added faux pen stitching to complete my layout.

KarynCropsCroptoberfest2019Layouts - Page 011


KarynCropsCroptoberfest2019DoubleLayouts - Page 002

For my second layout, I created my own acorn embellishments by cutting ovals using the Custom Cutting System and used scissors to free-hand cut stems and points from the brown print and burlap print papers.  For my largest acorn, I used the largest Oval Pattern and the Blue Blade on the inside edge to cut my acorn and the Red Blade on the inside edge to cut my acorn cap.  For my smaller acorns, I used the medium Oval Pattern and the Blue and Red Blades on the inside edge to cut my pieces.  I used the larger pieces for the caps of my acorns.


My strip from the pinecone print paper measures 10″ x 3-3/4″; the brown print strip is 11″ x 1-1/4″; and the burlap strip is 10-1/2″ x 1/2″.  My photo mats are from Dark Green Cardstock and measure 4-1/4″ x 4-1/4″ and 4-1/4″ x 6-1/4″.  I used a brown pen to ink around the edges of the acorn pieces and designer print paper strips.  I also did some pen work around the edges of my pages and drew some journaling boxes.  I finished the layout by adhering some stickers and embellishments with Foam Squares.

KarynCropsCroptoberfest2019Layouts - Page 005
KarynCropsCroptoberfest2019Layouts - Page 004

KarynCropsCroptoberfest2019Layouts - Page 010
Triangles and a folded triangle page at CM have been all the rage recently. (See the CM Blog.)  So I was inspired to create a triangle pumpkin layout.  To make my layout, cut out a hollow frame from the pinecone print paper, and adhere an 11″ x 11″ piece of White Cardstock.  From the designer print paper, cut 2-1/2″ squares, and cut them in half on the diagonal.  Arrange as shown and freehand cut a stem from the brown Croptoberfest cardstock.  I cut my photo mat to 6-1/4″ x 4-1/4″ and added stickers and embellishments adhering some with Foam Squares.  (The Copper Cardstock was and exclusive color from CM’s recent Cardstock Buffet.)

KarynCropsCroptoberfest2019Layouts - Page 009

My next layout is ready for my group photo from my Croptoberfest workshop.  For the base, I used the sheet of blue cardstock in the Croptoberfest Kit.  The white plaid strip is 3″ x 12″, and the green plaid strip is 4-3/4″ x 9-1/2″.  I used the Original Border Maker System and the new Leaf Border Maker Cartridge to punch a border from the teal patterned paper.  I used the Song Birds Punch to punch borders from the brown Croptoberfest cardstock and our Dark Green Cardstock and layered the borders for depth.  My photo mats measure 6-1/4″ x 4-1/4″ and 4-1/4″ x 4-1/4″ and are cut from the Dark Green Cardstock.  I used the insert in the Croptoberfest Gift Embellishment Pack as a title block and added some embellishments.

KarynCropsCroptoberfest2019Layouts - Page 008


You may have already seen my last layout on the Creative Life Scrapbooking Facebook page.  Today, I’m the featured designer for our Border Maker Monday post.  This layout is super sweet, and I’m anxious to complete it with photos.

KarynCropsCroptoberfest2019DoubleLayouts - Page 001

To make the border featured on my layout above, cut a 3″ strip from the Cratered Blue Cardstock (This was a limited edition cardstock available during CM’s recent Cardstock Buffet.) and punch one end with the Lace Trim Border Punch. Adhere this piece to a 2″ strip of the white plaid paper and adhere to the green plaid paper. Punch a border from the brown cardstock in the Croptoberfest Kit with the Lattice Border Punch. Adhere this piece onto of the blue as shown. Cut square pieces from the brown patterned paper in the Croptoberfest Kit and mat with the blue cardstock. Adhere these pieces with Foam Squares. My photo mats are 4-1/4″ x 6-1/4″ and 6-1/4″ x 6-1/4″. Punch one end of the larger mats with the Lace Trim Border Punch. Use the Song Birds Border Punch to punch borders from the Croptoberfest Kit brown cardstock, and adhere the bird borders with Foam Squares. Add a few stickers from the Croptoberfest Kit and also some of the exclusive Croptoberfest Gift Pack Embellishments.

KarynCropsCroptoberfest2019Layouts - Page 001

I hope that I’ve inspired you to purchase a second Croptoberfest Kit and make some additional layouts!  If you don’t have a CM advisor, I would be glad to mail a kit and embellishments to you!

Please leave a comment and let me know which layout that you like best!

I’ll be back later this month with layouts featuring the Harvest Delight Collection.
Bye for now!