Welcome to our Creative Life Scrapbooking Winter Blog Hop! We’re sharing ideas using some of our favorite Creative Memories products that were released this winter. Just follow the links at the bottom of my post to continue blog hopping.
I used the new Ever After Collection from Creative Memories for my layouts. Although this collection is marketed as a wedding collection, I found that the colors and patterns worked beautifully for some photos of my new granddaughter. Most of the stickers are wedding themed, so I only used a few stickers and relied on the Ever After Laser Cut Frames and Ever After Variety Mats to adorn my pages. For my titles, I used some older CM products.

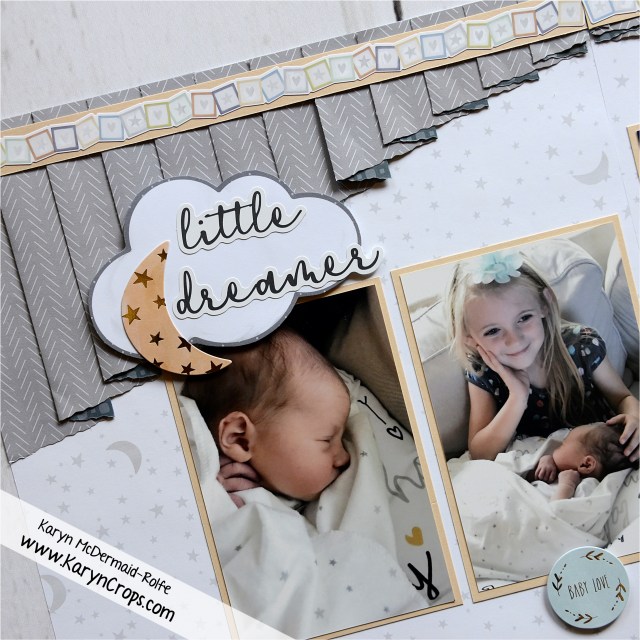
For my first layout, I created a shabby chic ruffed border by tearing ~1″ strips from the green designer paper, crumpling it up, unfolding it, and then randomly folding pleats forwards and backwards. Afterwards, I flattened the top edges with my hands and taped the pieces to a strip of cardstock to make it easier to handle. I then adhered the entire piece to my page and covered the top edge with an Ever After sticker strip adhered with Foam Squares. Underneath the top edge, I tucked in a border punched from a variety mat with the Original Border Maker System and new Rose Chain Border Maker Cartridge.


I made a paper bow from the wood print designer paper and also matted my 7″ x 5″ photo with the same paper. I included a frame from the embellishment pack under the top edge of my photo and added some stickers around my bow. The title is from the old Everyday Sentiments Laser Cut Embellishments.

My second layout consists of multi-layers of paper strips and borders. The rose print paper measures 12″ x 3-1/2″, the light green print paper is 12″ x 3-1/4″, and the two dark green print strips are 12″ x 1/4″. I included a border on the top that was punched from the light green print paper with the Original Border Maker System and new Heart Duet Cartridge and a border in the middle punched with the Original Border Maker and new Rose Chain Cartridge.

I matted my 7″ x 5″ photo with the mauve striped paper and slid the entire piece into an oval frame from the embellishment pack. I layered the photo piece over a lovely floral laser cut piece also from the embellishment pack.

I finished the layout with Ever After stickers under the top corner of the photo and title stickers from the Little Lamb Girl Stickers.

I pieced together a few strips of paper to make the background of my third layout. I punched the top edge of a 12″ x 7″ piece of light green print paper with the Original Border Maker and Garland Cartridge and adhered this piece on top of a 12″ x 5-1/4″ piece of wood print paper. I adhered a 12″ x 1-1/2″ strip of wood print paper underneath the top edge of the light green print paper and left a 1/4″ exposed at the top – making sure that my total page measures 12″ x 12″. I matted my photo with a 4-1/4″ x 6-1/4″ piece of wood paper and layered it over a frame from the embellishment pack.

I used an old Natural Elegance Variety Mat as my title and layered it over an Ever After Variety Mat and roses that I fussy cut from the rose print paper. I added a laser cut embellishment from the embellishment pack on top of the title card.

Lastly, I used the Original Border Maker with Rose Chain Cartridge to punch two rose borders from the mauve striped paper and layered these pieces underneath the garland border at the top of the page.

To create my last layout, I fussy cut half of the outside edge of a sheet of the rose print paper and adhered this to a sheet of 12″ x 12″ white cardstock. I then cut a 1/4″ frame from the outside edge of a sheet of the wood print paper and adhered this to my page. My photo is matted with a 4-1/4″ x 6-1/4″ piece of wood paper and layered on top of a green striped variety mat.

To embellish my layout, I fussy cut more roses from the rose print paper and included Bloom & Blend Greenery Embellishments and a title from the Little Lamb Girl Stickers.
I hope that I’ve inspired you with the Ever After Collection. Any of my layouts could be used for other types of photos – including wedding photos – and can also be easily adapted into double-page spreads or adapted to include more photos and journaling.
This slideshow requires JavaScript.
Please leave a comment below and let me know which idea you might try or which layout that you like best. You may purchase the materials and tools that I used on my Creative Memories website. You may also like to follow me on my private Facebook Page, Karyn’s Croppers. You can also find Creative Life Scrapbooking on Facebook.
For more inspiration, please continue with our Creative Life Scrapbooking Winter Blog Hop and visit Julie next.
Lisa’s Workshop
Organized & Creative Mom
Karyn Crops (You Are Here)
Julie’s Creative Memories Blog
D. Brinsley’s Memory Keeping Blog
Scrappin’ Jpegs
Crop With Stef